• Home
  • Categories
  • Contact
  • Subscribe
  • About
Menu

Julie's Taste

Street Address
City, State, Zip
Phone Number

Your Custom Text Here

Julie's Taste

  • Home
  • Categories
  • Contact
  • Subscribe
  • About

TUNA SALAD WITH WALNUTS & CRANBERRIES ON APPLE SLICES

July 7, 2024 Julie Sanchez

This is currently my new favorite weekend lunch. It’s super easy to prepare and satisfying with the crunchiness of the tart apple combined with the walnuts and cranberries. And what goes best with apples and walnuts… my personal favorite…cheddar cheese. I added a slice for added protein and yuminess!


Solid White Albacore Tuna packed in olive oil is my fav… it is simply more moist. I always use avocado oil mayo since it is made with a healthy oil. You can substitute pecans for walnuts. Broccoli Sprouts are great since they pack a punch healthwise. Organic Honeycrisp apples are my apple of choice. By the way, I always store my nuts and cranberries in the freezer… they stay much fresher that way.


Drain the tuna, add to a mixing bowl and break up with a fork.


Cut the celery into strips and then mince.


Chop up the walnuts.


Cranberries pack a punch, so I prefer to chop them so you get just a hint of sweet tartness.


Combine everything, add salt to taste and mix thoroughly. If you used tuna packed in water you will need more mayo or olive oil for moistness. Sprinkle with salt to taste.


Slice off the top of the apple, then slice into about 3/8” thick slices. Use a teaspoon to carefully go around core and remove. It is too difficult to remove core with a knife… you will end up splitting the apple ring.


You really do not have to cut the cheese in rounds… but I like pretty food.


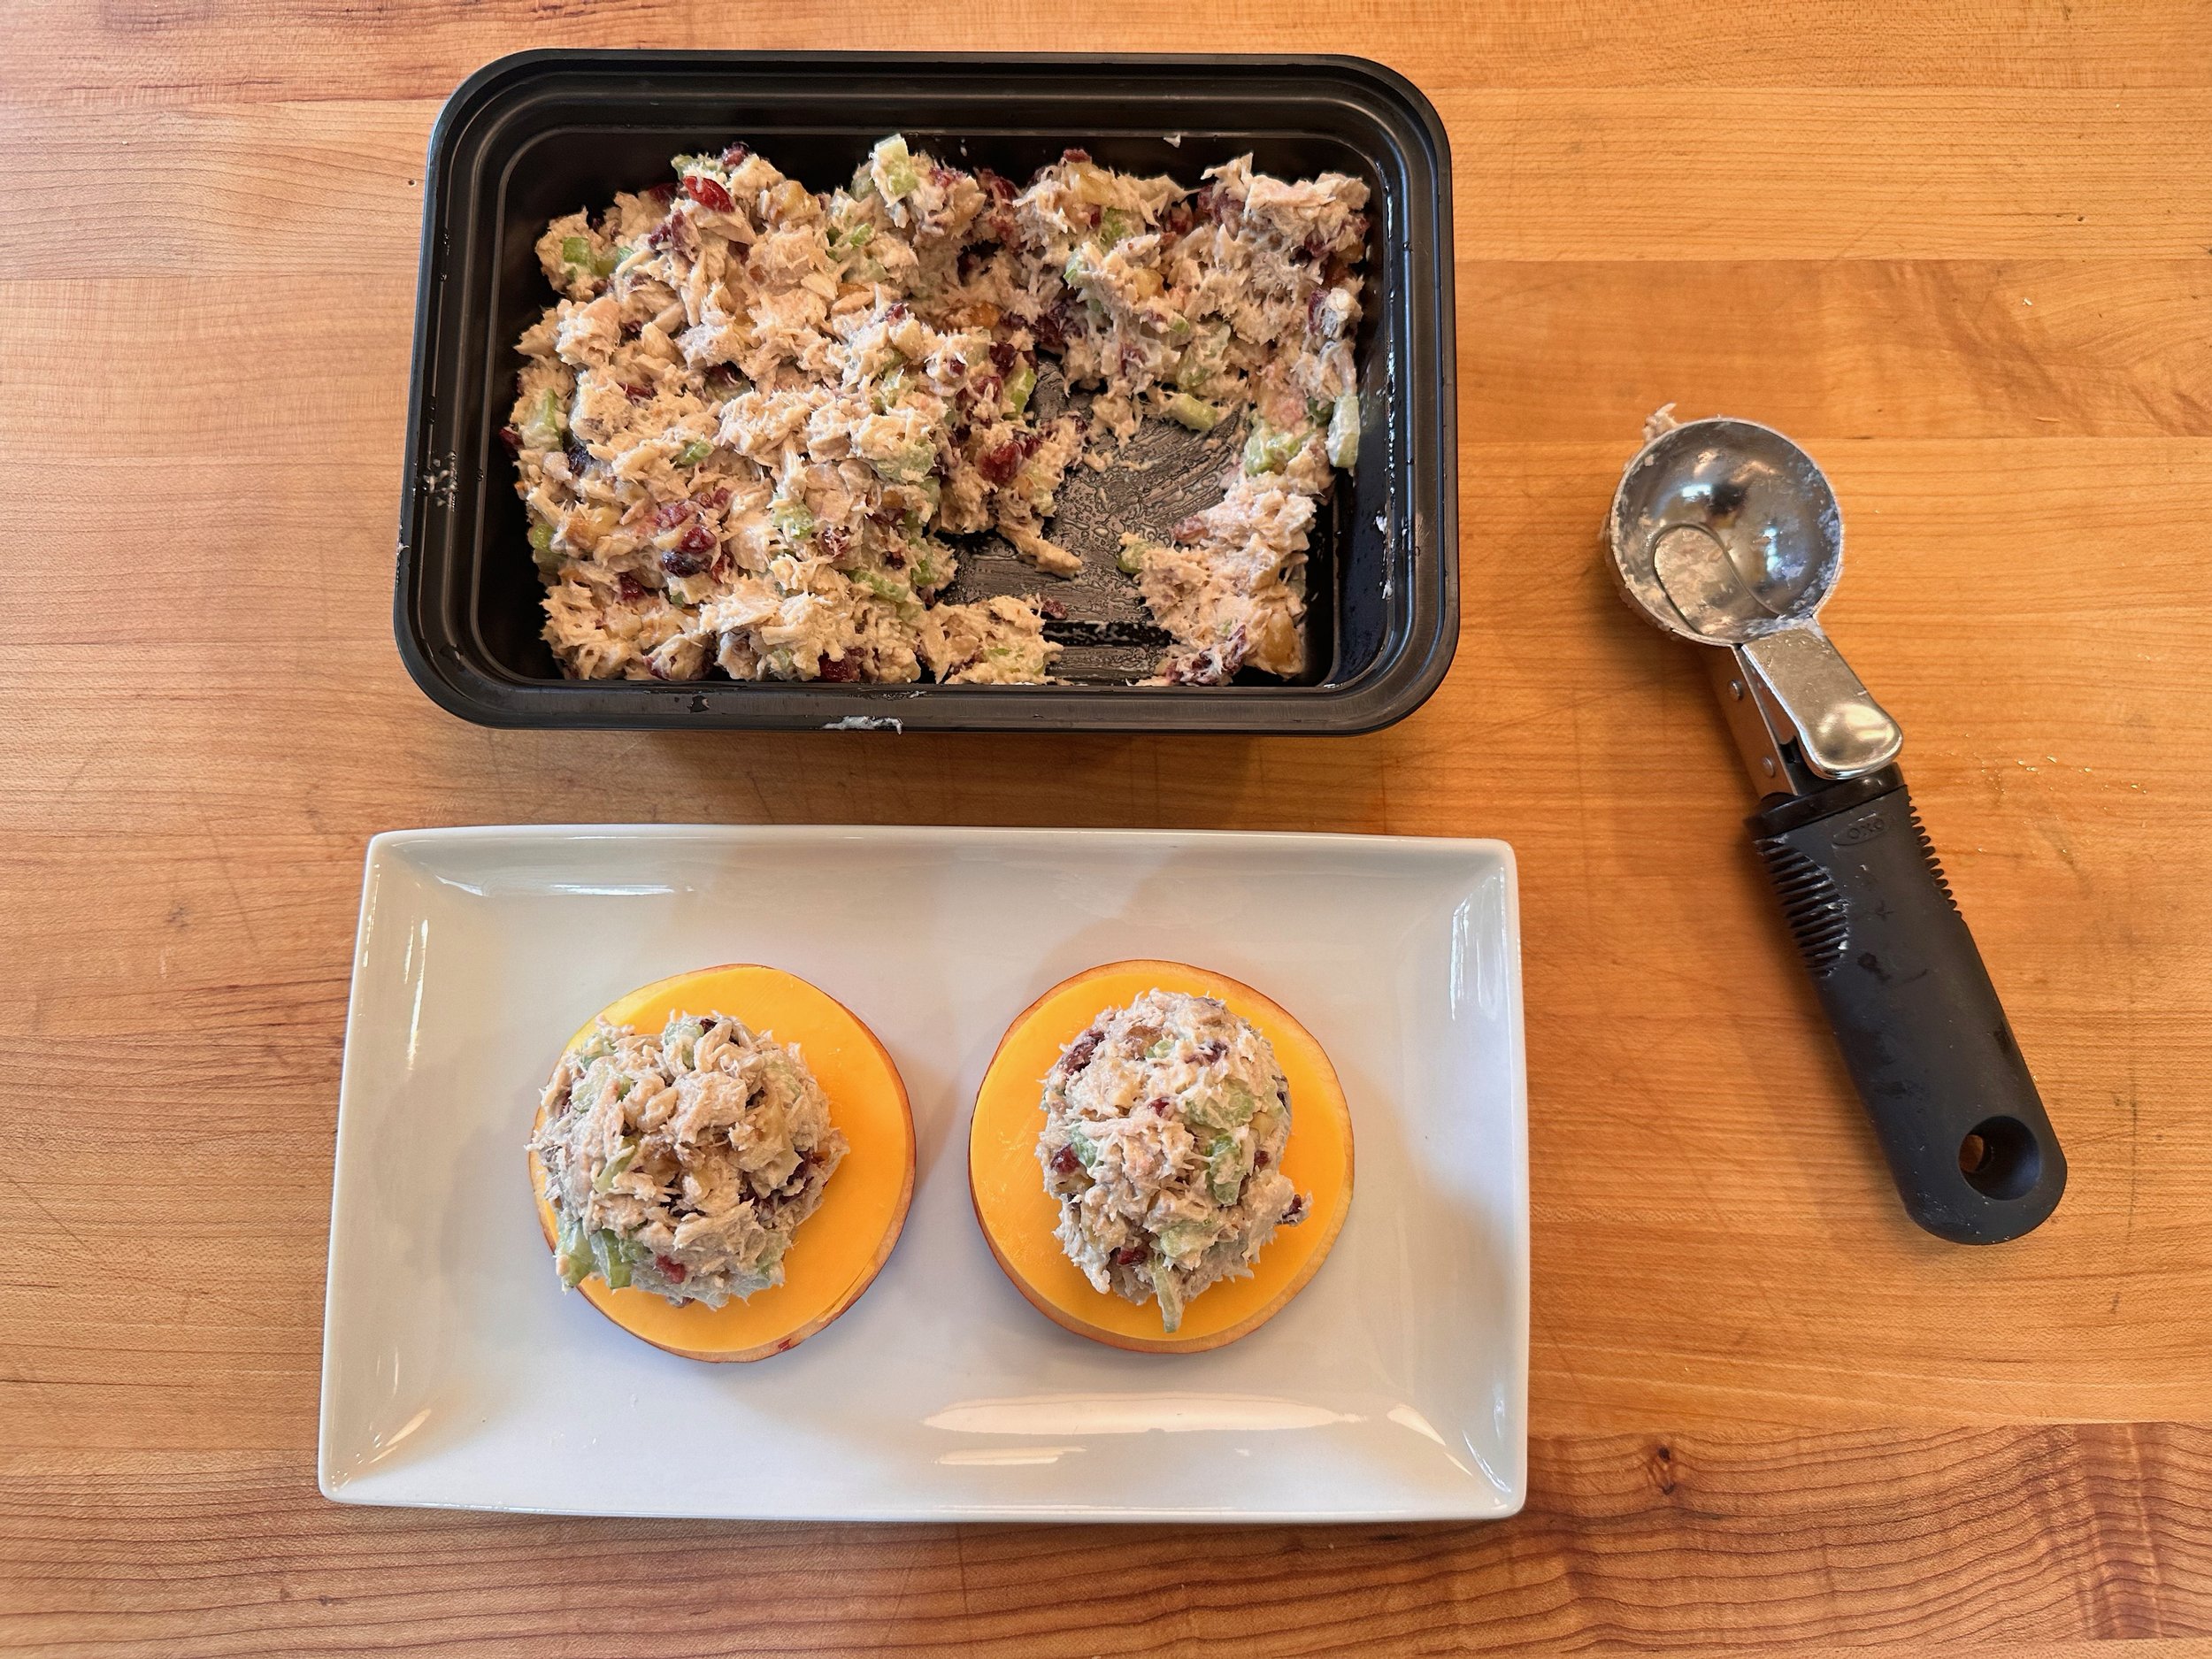
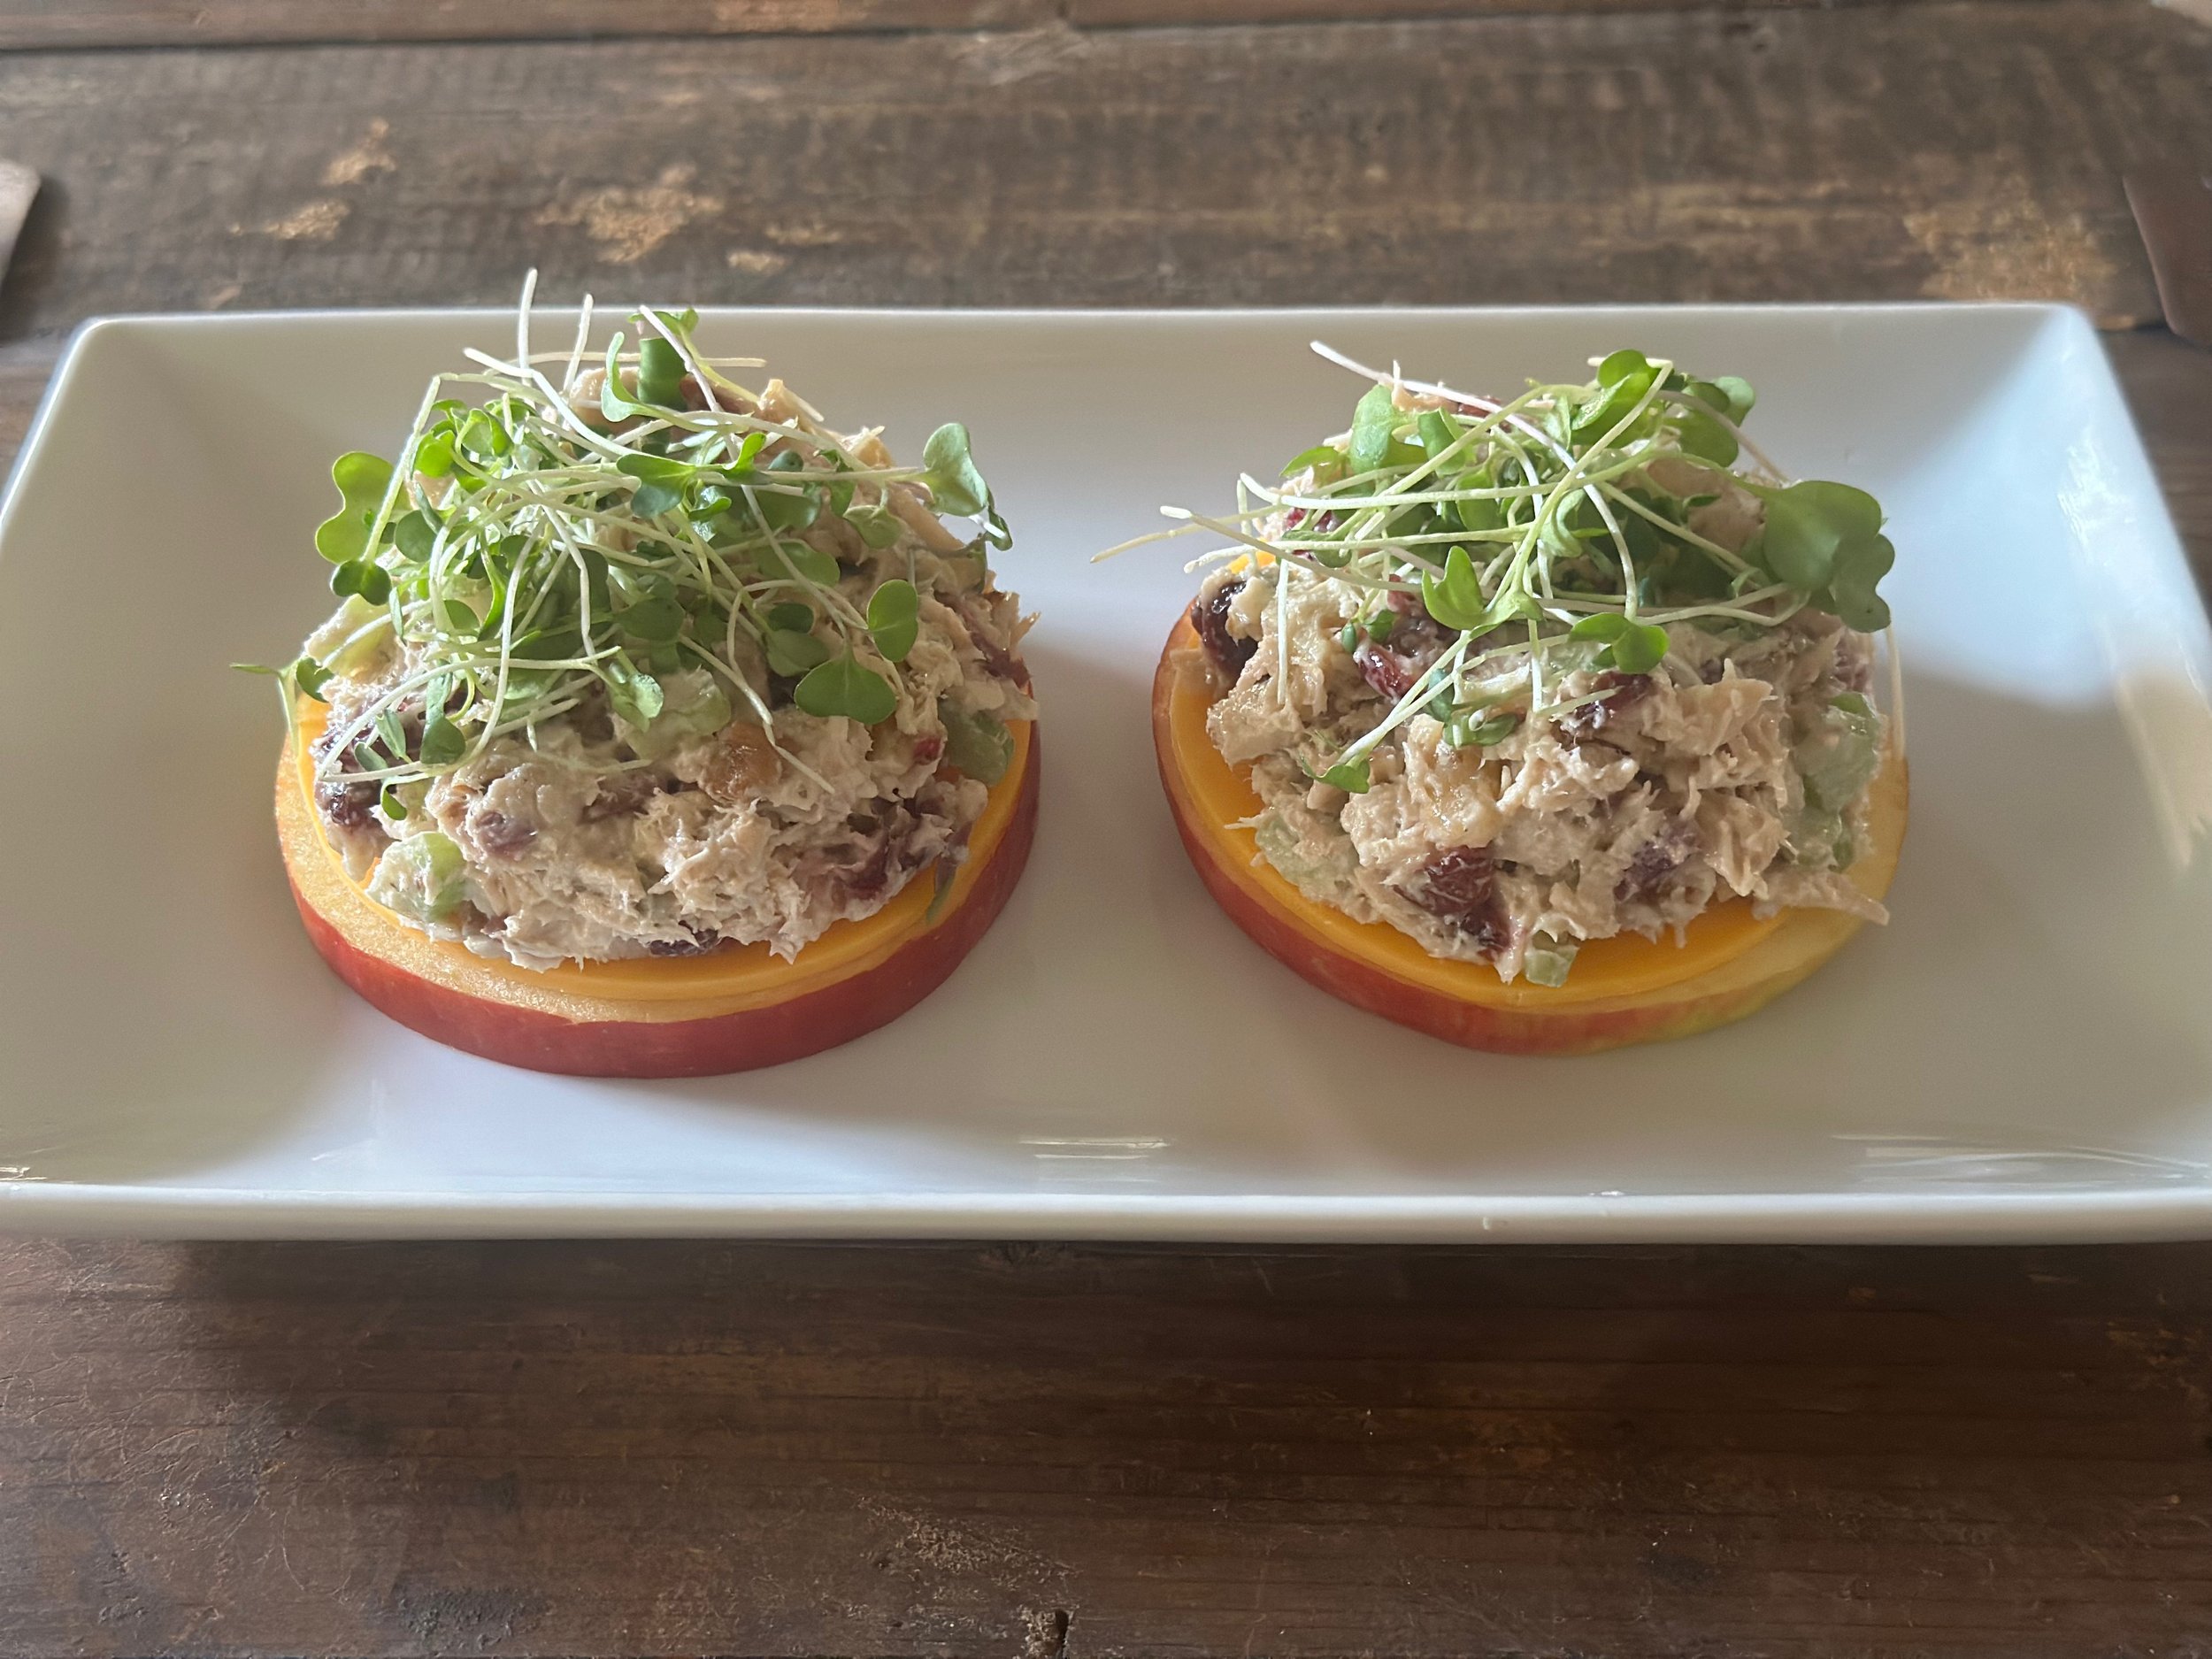
You can use a ice cream scoop or a spoon to mound the tuna on the apple. Serve 2 Slices per person.


Top with micro greens or sprouts.


TUNA SALAD WITH WALNUTS & CRANBERRIES ON APPLE SLICES RECIPE


Serves: 3-4 People
Prep Time: 20 Minutes

INGREDIENTS

  • 2 cans solid white tuna packed in oil

  • 1/2 cup celery, chopped (roughly 2 stalks)

  • 1/2 cup walnuts, chopped (or pecans)

  • 1/4 cup cranberries, chopped

  • 1/3 cup mayonnaise ( I prefer avocado oil mayo)

  • salt to taste

  • 2 apples, sliced thickly (1 apple for 2 people)

  • cheddar cheese slices, 2 per person

  • sprouts or micro greens

PREPARATION

  1. Drain tuna (If it is packed in oil…drain in trash not sink) and place in medium bowl. Break up tuna with a fork.

  2. Cut celery into strips and then dice. Add to the tuna.

  3. Cut up the walnuts and add to tuna.

  4. Cut up the cranberries and add to tuna.

  5. Add mayo and salt to taste. If using tuna packed in water you will need to add a splash of olive oil or more mayo to the mixture.

  6. Slice the top off the apple and slice into 3/8” slices.

  7. Add your cheese of choice on top of sliced apple.

  8. Add tuna and top with sprouts and micro greens.

  9. Serve 2 slices of apple topped tuna per person.


PRINT RECIPE


In Salad, Main Course, Seafood

POACHED SALMON WITH DILL YOGURT SAUCE

September 26, 2020 Julie Sanchez
DSC06378.jpg

We eat salmon once a week, so I am always trying new ways to prepare it. This dish was definitely inspired by Persian food, which our family loves. The creamy dill yogurt sauce has a cool tang and freshness with the salmon. I poach the salmon in this recipe, which is a nice way to keep the fish moist and tender. I like to serve this salmon laying on a bed of Herbed Couscous with Lentils, another recipe I created inspired by Persian food.


DSC06235.jpg

You need Greek yogurt (Greek yogurt is thicker than normal yogurt which you need since you are adding lemon juice; normal yogurt will make your sauce too thin) lemon juice, garlic, and fresh dill (dried dill will work in a pinch). You can keep the skin on the salmon, since once it is poached the skin will just slid right off.


DSC06215.jpg

Squeeze the juice of 1 lemon, save the lemon rinds for your poaching liquid.


DSC06246.jpg

Combine 1/2 cup of yogurt, lemon juice, and salt and pepper in a small bowl.


DSC06253.jpg

Add 1 clove of crushed garlic.


DSC06259.jpg

Remove the large stems from the dill, and finely chop the dill. Save the stems to throw in the poaching liquid with the salmon. Save two small sprigs of dill for garnish.


DSC06262.jpg

Ready to whisk or stir together.


DSC06271.jpg

If your a perfectionist, transfer the sauce to a smaller bowl. I like to make the sauce a day or at least a couple hours ahead of time, as the flavor will just get better over time.


DSC06277.jpg

In a saucepan add the lemon rinds and the leftover dill stems. Bring the water to a boil.


DSC06335.jpg

Once the water is simmering, gently place your salmon in, cover and let simmer for 10 minutes, or until salmon is cooked through.


DSC06340.jpg

Carefully remove salmon from the pan and dry on paper towels. If the salmon has skin, turn the salmon on its side and use a knife to gently brush off the skin.


DSC06346.jpg

Add salt and pepper to your salmon. Garnish with yogurt sauce and a sprig of dill.


DSC06328.jpg

I highly recommend serving the salmon on this Herbed Couscous with Lentils…. they were destined to be together.


POACHED SALMON WITH DILL YOGURT SAUCE RECIPE


Serves: 2 people
Prep Time: 10 minutes
Cooking Time: 10 minutes

INGredients

  • Two 5-6 ounce pieces of salmon

  • 1/2 cup Greek yogurt (if you do not have Greek Yogurt, simply zest the lemon, instead of juicing it, so your sauce will not be too thin)

  • 1 tablespoon lemon juice ( juice of 1 lemon)

  • 1 clove of garlic, minced

  • 2 tablespoons fresh dill, minced (or 2 teaspoons dried dill)

PREPARATION

  1. Make yogurt sauce first so you can throw the lemon rinds into the poaching liquid. Combine the yogurt, lemon juice, salt and pepper, garlic and dill in a small bowl. Add salt and pepper to taste. Stir till smooth. (The yogurt sauce only gets better over time, so make it in advance if possible.)

  2. Add water to a pan, enough water to cover the fish. Add the lemon rinds and any leftover fresh dill stems. Bring to a boil, reduce heat to a simmer, then add the fish, and cover. (If you have white wine open you can splash some wine in the water as well.)

  3. Let simmer for 10 minutes or until till cooked through.

  4. Carefully remove each salmon piece and place on paper towels to dry. If the salmon has skin, you can easily peel it off now.

  5. Sprinkle salt and pepper on salmon.Serve with the yogurt sauce. Garnish with a sprig of dill. Salmon can be served hot, warm, or cold.

Note: This Poached Salmon is very refreshing when served on the my Herbed Couscous with Lentils.


PRINT RECIPE


In Main Course, Seafood, Salmon

CRUNCHY DIJON COATED HERB SALMON

July 13, 2019 Julie Sanchez
DSC04890.jpg

We eat salmon once a week, so I am always trying to find new ways to prepare it. For this dinner pictured above I served the salmon on pureed broccoli and roasted potatoes. The first time I ever ate salmon was in Paris with my dear friend Candice. It was served with potatoes and seasoned with dill. That combination of flavors has remained forever etched in my memory of deliciousness!


DSC04785.jpg

You need 6-8 ounce salmon fillets with the skin removed. You can use dried dill, if you do not have access to fresh herbs. Panko breadcrumbs are much crunchier than normal bread crumbs.


DSC04868.jpg

Measure out 3 tablespoons panko bread crumbs into a small bowl and add 1 teaspoon olive oil.


DSC04869.jpg

Add a pinch of salt and black pepper to the panko mixture.


DSC04871.jpg

Chop up finely any combination of fresh herbs you like. Italian Parsley, Dill, or Cilantro all work great. You can also substitute dried dill, since buying a whole batch of herbs to only use a small amount is wasteful. I grow fresh herbs in the summer, so I always have them around. In the winter I tend to just use the dried dill, unless I happen to have extra cilantro in the fridge.


DSC04874.jpg

Add the herbs to the panko and stir to combine.


DSC04875.jpg

Measure 1 teaspoon dijon mustard on each fillet.


DSC04877.jpg

With a pastry brush or your fingers spread the mustard on the sides and top, not the underneath side.


DSC04881.jpg

Sprinkle the panko mixture on the top only. It may cascade down the sides, which is fine. You may not need all the mixture if your fillets are smaller. All of this can be prepped in advance. At this point if you are only prepping, you can gently cover the place the salmon in the fridge.


DSC04882.jpg

Line a baking sheet with parchment paper or foil for easy clean up. Place the salmon on the parchment and bake for 10-15 minutes at 400 degrees.


CRUNCHY DIJON COATED SALMON RECIPE


Serves: 2 people
Prep Time: 10 minutes
Cooking Time: 12 minutes

INGREDIENTS

  • Two 6-8 ounce pieces of skinless salmon

  • 3 tablespoons panko bread crumbs

  • 1 teaspoon olive oil

  • salt and pepper

  • 1 tablespoon minced fresh herbs: italian parsley, dill and or cilantro. (Alternatively you can substitute 1/2 teaspoon dried dill)

  • 2 teaspoons Grey Poupon dijon mustard

PREPARATION

  1. Preheat oven to 400° F.

  2. Measure 3 tablespoons panko bread crumbs into a small bowl.

  3. Add 1 teaspoon olive oil to the panko mixture.

  4. Add a pinch of salt and black pepper.

  5. Add either 1/2 teaspoon dried dill, or 1 tablespoon minced fresh herbs. Stir panko mixture till combined and oil is distributed.

  6. Place your salmon on a plate, and place 1 teaspoon of dijon mustard on each fillet.

  7. Spread mustard with a pastry brush or your fingers on the sides and top of the salmon but NOT underneath the fish.

  8. Sprinkle the panko mixture on the top of the fish.

  9. Line a baking sheet with parchment paper or foil.

  10. Place the fish on the baking tray and cook for 10-15 minutes. 12 minutes is ideal for me, and the salmon is cooked thoroughly.


PRINT RECIPE


In Main Course, Seafood, Salmon

SHRIMP SALAD WITH LEMON AND DILL

July 1, 2018 Julie Sanchez
DSC04199.jpg

Shrimp salad with lemon and dill is so refreshing and perfect for hot summer days. I love that you can make this salad in advance and just pull it out of the fridge and place it on an avocado half or a bed of arugula and you have a beautiful delicious meal. This is one of our go to meals on Friday nights, when we play golf till 7:30, make a grapefruit martini, pull dinner out of the fridge, and begin to enjoy the weekend.


DSC04216.jpg

I prefer to buy larger shrimp, about 16-20 shrimp in a pound, since peeling and cleaning them can be time consuming. I also like to buy wild caught, not farm raised shrimp.  Primal Kitchen's avocado mayo is my new go to mayo. You also need fresh dill; dried dill will not pack the same punch in this recipe.


DSC04231.jpg

You need a microplane for zesting in this recipe. You can also use the microplane for Parmesan shavings in other recipes, so it is worth investing in one.


DSC04226 (1).jpg

Measure out 2/3 cup of mayo in a large rimmed bowl since zesting can be messy. Zest your 2 lemons, turning the lemon as you zest to make sure you do not get the bitter white pith in your zest. 


DSC04235.jpg

Cut your lemons in half and squeeze the juice into a small bowl. Measure 2 tablespoons lemon juice into the mayo mixture. Put the remaining juice and lemon halves into a large pot that you will boil the shrimp in. Fill the pot half up with water and bring to a boil.


DSC04237.jpg

Pick the dill off the larger branches.


DSC04238.jpg

Chop the dill finely, add 3 tablespoons to the mayo mixture.


DSC04239 (1).jpg

Add 1/4 teaspoon salt, and freshly ground pepper to the mayo mixture and stir till smooth.


DSC04242.jpg

Prepare a ice bath for your shrimp with a large bowl filled with ice and cold tap water. Once your water is boiling add your shrimp. Set your timer or stopwatch on your phone for 4 minutes. Keep fire on high. The boiling should resume, but even if it does not, you can tell when the shrimp are done when 1 or 2 shrimp float to the top of the water. So do not overcrowd the shrimp in a small pot; use a large pot. Remove your cooked shrimp with a slotted spoon and place in the ice bath.


DSC04243.jpg

The ice bath keeps the shrimp from overcooking and they're easier to peel when they are cool.


DSC04247.jpg

Drain the shrimp and then peel them.


DSC04249.jpg

Cut down the top of each shrimp to clean the yucky brown poo from the shrimp. You may have to run the shrimp under water to clean it well.


DSC04250.jpg

Once cleaned, place the shrimp in paper towels and dry thoroughly so the mayo mixture can adhere to the shrimp.


DSC04254.jpg

Cut the shrimp into small pieces and add to a medium sized bowl.


DSC04255.jpg

Slice the celery straight across the grain as thinly as possible.


DSC04261.jpg

Add the celery to the shrimp mixture. Add half the mayo mixture and stir till combined. Keep adding mayo till you achieve the consistency you desire. Refrigerate for several hours before serving.


DSC04207.jpg

For an easy appetizer you can use this shrimp salad to fill store bought phyllo cups.  Garnish with a piece of dill.


IMG_1795.jpg

Summer in a bowl!


SHRIMP SALAD WITH LEMON AND DILL RECIPE


Serves: 5 people
Prep Time: 20 minutes
Cooking Time: 4 minutes

INGREDIENTS

  • 2 pounds of shrimp

  • 2/3 cup of mayonnaise

  • zest of 2 lemons

  • 2 tablespoons lemon juice

  • 3 tablespoons fresh dill, chopped finely

  • 3/4 cup thinly sliced celery, 2-3 stalks

  • 1/4 teaspoon salt

  • ground pepper to taste

PREPARATION

  1. Measure out 2/3 cup of mayonnaise into a medium bowl.

  2. Zest the 2 lemons into the bowl with the mayonnaise. Be careful to keep turning the lemon as you zest so you only get the yellow zest and not the bitter white pith of the lemon.

  3. Cut the lemons in half and squeeze the juice into a separate small bowl. Put 2 tablespoons juice into the mayo mixture.

  4. Put the remaining juice and lemon halves into a large pot of water in order to boil the shrimp.

  5. Pick the dill off the big stems and chop finely.

  6. Add the dill, salt, and freshly ground pepper to the mayo mixture and stir till smooth.

  7. Turn the large pot of water and lemons on high heat.

  8. In a large bowl add ice and cold tap water for an ice bath for the shrimp.

  9. Once the water is boiling add the shrimp.

  10. Set your timer or stopwatch on your phone for 4 minutes. The water should come back to a boil. You know the shrimp are done when 1 or 2 shrimp start to float to the top.

  11. With a slotted spoon, place the shrimp in the ice bath.

  12. Drain the shrimp and peel.

  13. Devein the shrimp and wash again and dry thoroughly with paper towels.

  14. Pull out a larger bowl to add the shrimp to as you cut them into smaller pieces.

  15. Thinly slice the celery and add to the shrimp.

  16. Add half the mayo mixture and combine. Keep adding more mayo till you achieve your desired consistency.

  17. Refrigerate for at least 3 hours before serving.


PRINT RECIPE


In Salad, Main Course, Seafood

CITRUS GLAZED SALMON

November 4, 2016 Julie Sanchez

We try to eat salmon once a week, so I am always trying to create new ways to prepare it. My citrus glaze takes 5 minutes to prepare, and it really gives the salmon a awesome tangy and spicy kick. On weekdays I love easy healthy meals...this recipe totally fits into this category. During the week I bake my salmon for the easy button, but you could grill your salmon if you prefer; the citrus glaze works equally on either cooking method. I love this citrus glazed salmon with asparagus drizzled with a little olive oil, garlic and sea salt and roasted in the oven while the salmon is baking. (The asparagus will take a little less time to bake than the salmon) A perfect meal... easy, healthy and delicious!


I buy freshly squeezed orange juice, organic low sodium soy sauce, and local Texas honey. You need two 6-8 ounce salmon filets. I have the fish monger remove the skin. Yes the skin would come off easily after you cook it, but removing it can cause you to break your filet in half...trust me on this!


I like to use parchment paper or foil so my clean up is super easy.


Once your salmon is cooking, begin your sauce. Measure 1/3 cup orange juice into a small saucepan. Then squeeze your lemon into a small bowl so you can make sure you have about 2 tablespoons. Add the lemon juice, the soy sauce, the honey and a squirt of Sriracha to the orange juice mixture and put on medium heat. Once it begins to simmer set timer for 5 minutes.


This is the glaze simmering. It looks so cool!  The mixture should reduce by half.


Once you remove the glaze from the heat, pour into a small bowl to prevent further reduction.


CITRUS GLAZED SALMON RECIPE


Serves: 2 people
Prep Time: 10 minutes
Cooking Time: 12-15 minutes

INGREDIENTS

  • Two 6-8 ounce salmon filet (I have my fish monger remove skin)

  • 1/3 cup orange juice

  • 2 tablespoons lemon juice (1 lemon)

  • 2 tablespoons soy sauce (I prefer low sodium)

  • 1 tablespoon honey

  • Squirt of Sriracha hot chili sauce

PREPARATION

  1. Preheat oven to 425° F.

  2. Place foil or parchment paper (for easy clean up) on your cooking tray and place salmon. (No need to salt fish, since soy sauce has plenty of sodium.)

  3. Once oven has preheated place salmon in oven and cook for 12-15 minutes depending on your preference for the doneness of the salmon. 12 minutes is a little pink inside and 15 is cooked through.

  4. While salmon is baking prepare your glaze. Pull out a small sauce pan and measure in your orange juice.

  5. Squeeze your lemon in a separate bowl so you can make sure you have about 2 tablespoons of juice.

  6. Add lemon juice to pan, along with soy sauce, honey and Sriracha.

  7. Place sauce pan on burner and turn stove to medium heat. Once it begins to simmer, start your timer for 5 minutes. The liquid should reduce to half the amount in that time.

  8. Once 5 minutes is up, place the glaze is a small bowl to prevent any further reduction.

  9. Once salmon has baked, remove the fish and place on your serving dish or plate. Spoon glaze over fish and sprinkle with the black sesame seeds.


Note: This citrus glaze works equally well with grilled salmon. (You might as well grill your asparagus too.)


PRINT RECIPE


In Seafood, Salmon