• Home
  • Categories
  • Contact
  • Subscribe
  • About
Menu

Julie's Taste

Street Address
City, State, Zip
Phone Number

Your Custom Text Here

Julie's Taste

  • Home
  • Categories
  • Contact
  • Subscribe
  • About

FROZEN MARGARITAS

December 27, 2019 Julie Sanchez
DSC05550.jpg

I truly love frozen margaritas! Anyone who knows me well, knows that I have been perfecting my recipe for years. I like my margaritas tart and not too sweet. These are very strong… I am warning you now.


DSC05471.jpg

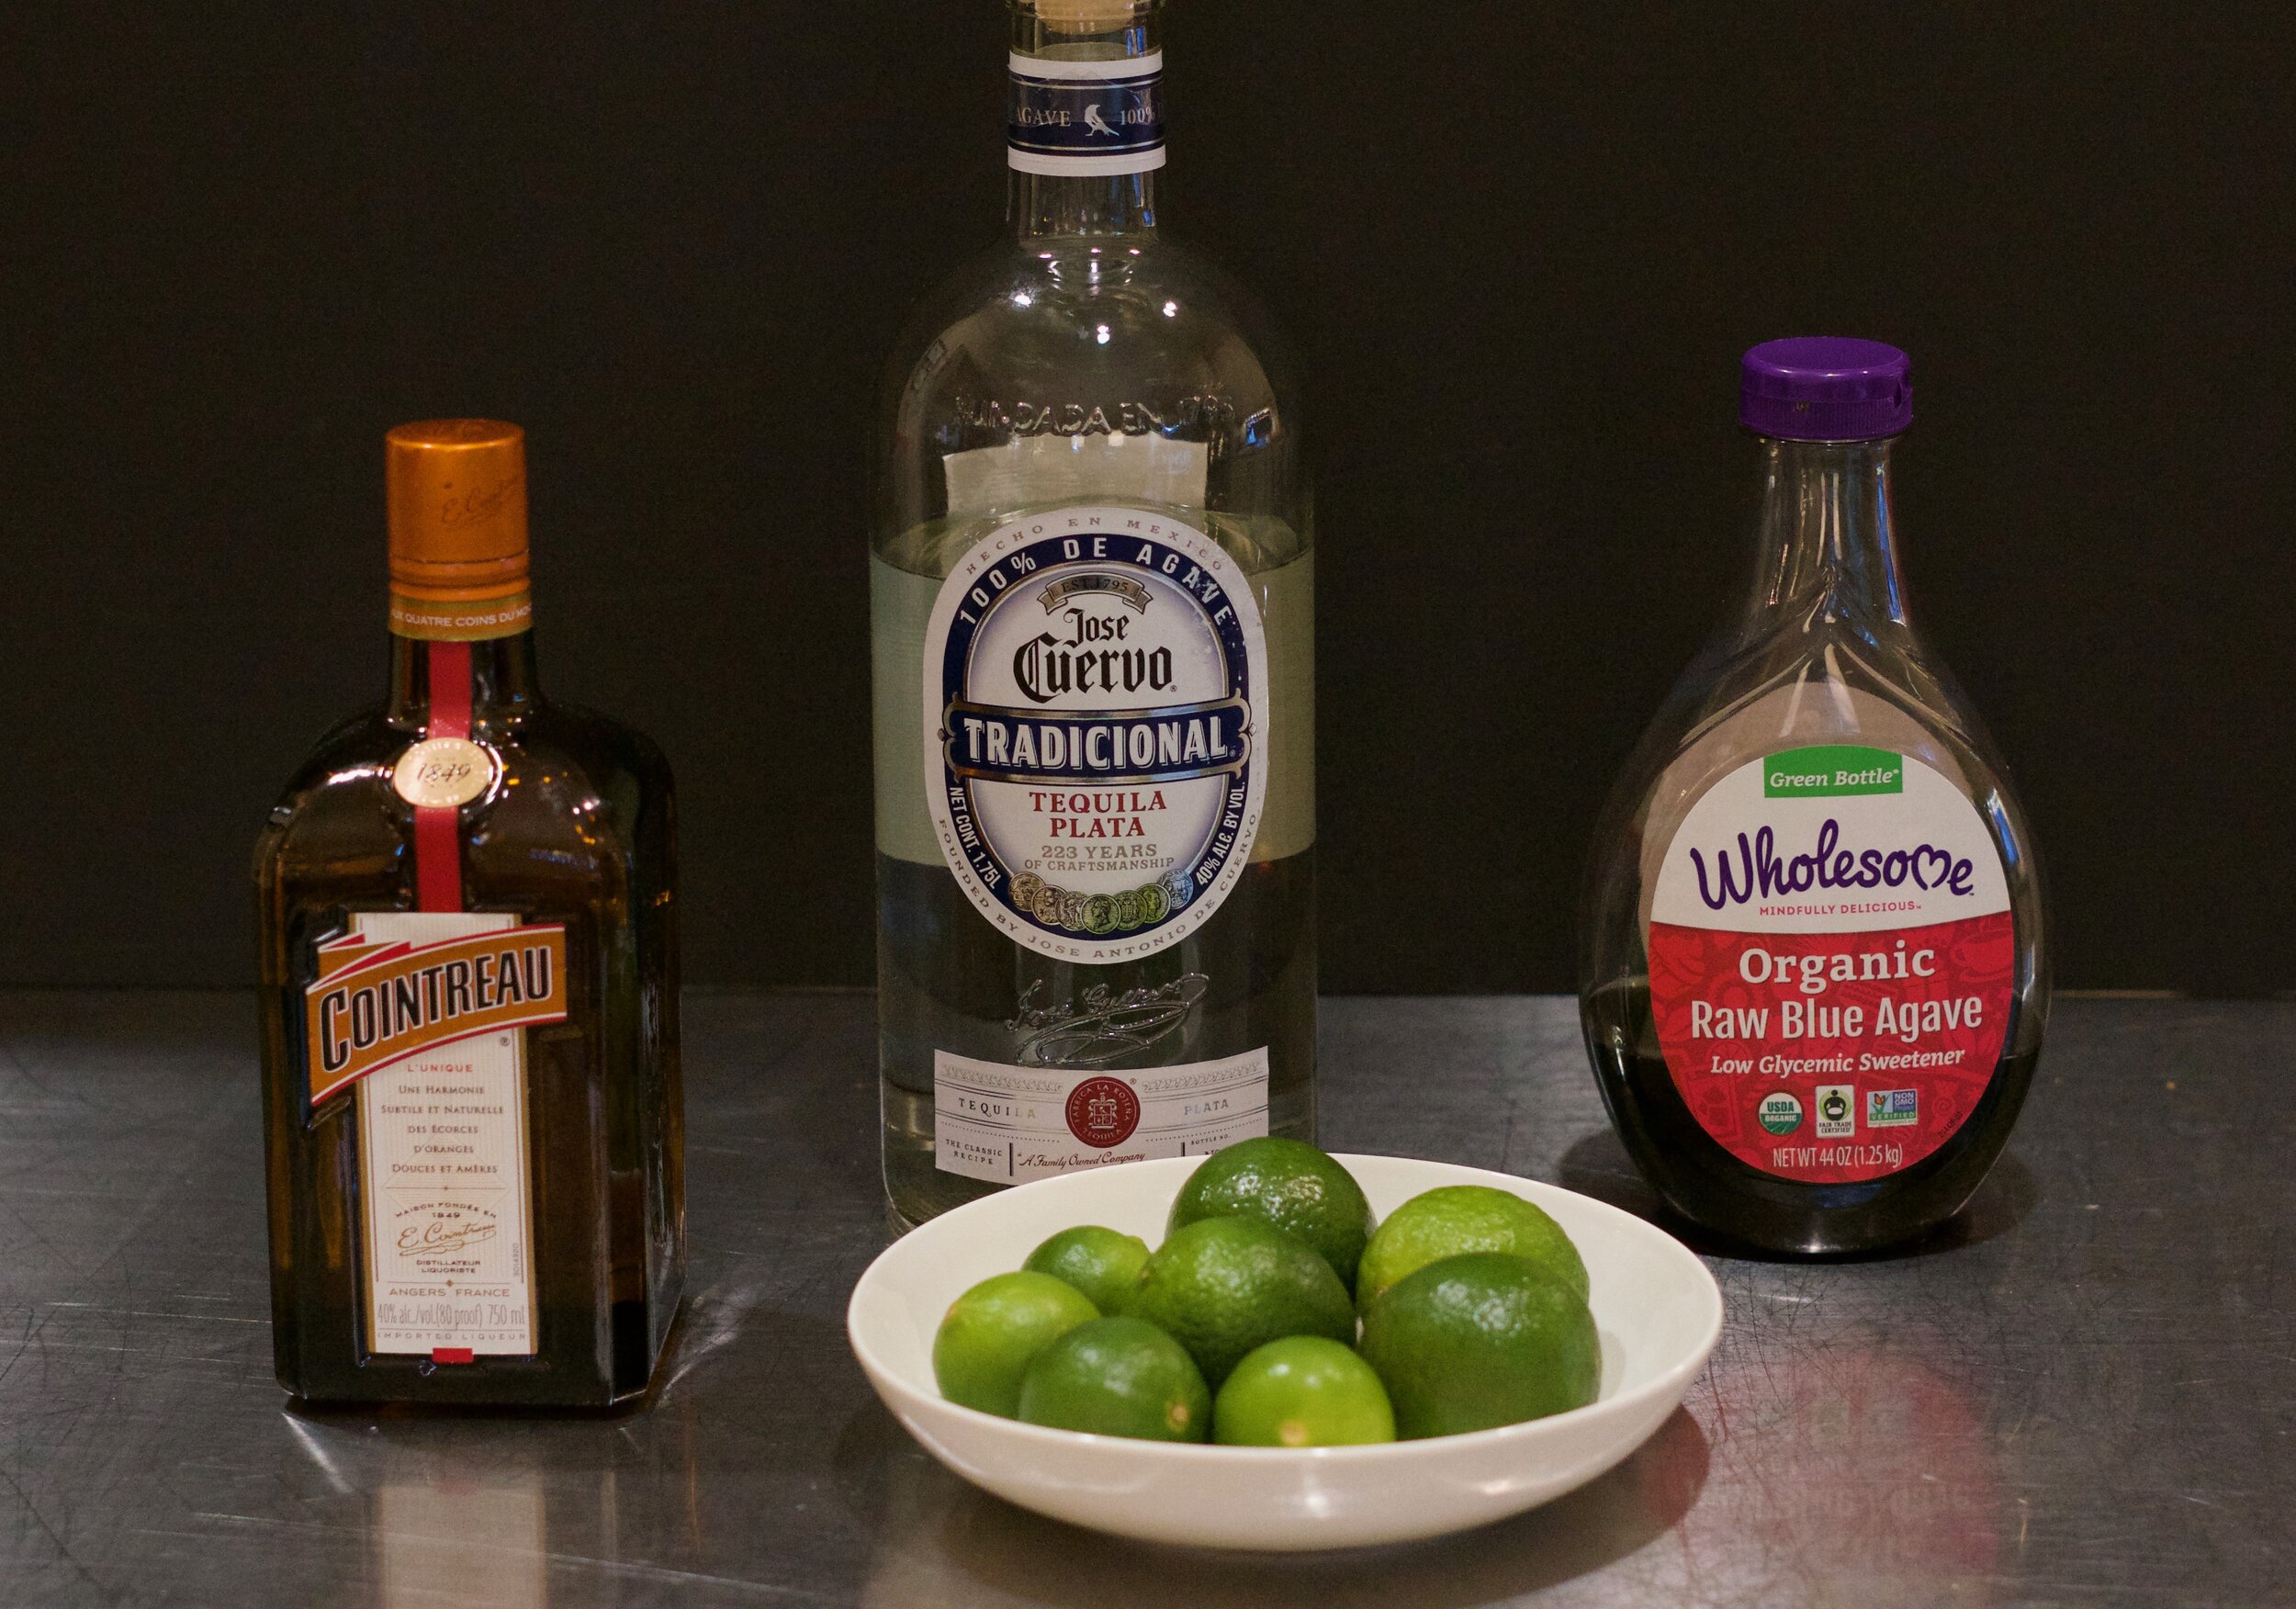
I like to use a combination of key limes and regular limes. Key limes are really tart and have more flavor than regular limes. I also use Cointreau instead of Triple Sec, but really you can use what you have on hand.


DSC05474.jpg

Juice the limes, I love my lime juicer tool from HEB. You need 4 ounces ( 1/2 cup).


DSC05475.jpg

Pour your lime juice in the blender, along with 2 ounces of Cointreau and 1 cup tequila.


DSC05479.jpg

Add 2 tablespoons agave to the mixture.


DSC05481.jpg

Now add 4 cups of ice. Blend till smooth, and add more ice if necessary. You do not want the mixture to be super thick; it should still be somewhat pourable. You can also taste for sweetness and add more agave if you prefer a sweeter taste.


DSC05487.jpg

FROZEN MARGARITAS RECIPE


Serves: 4 drinks
Prep Time: 5 minutes

ingredients

  • 4 ounces fresh lime juice ( I prefer a combo of regular limes and key limes) (I used 4 key limes and 3 limes for this batch)

  • 2 ounces Cointreau

  • 8 ounces tequila

  • 2 tablespoons agave

  • 4 cups ice

preparation

  1. Juice 4 ounces of lime juice. Pour into blender.

  2. Measure 2 ounces of Cointreau into blender, and 1 cup of tequila.

  3. Add 2 tablespoons agave to blender.

  4. Add 4 cups of ice.

  5. Blend on high speed till smooth and creamy, add more ice if needed. You do not want the mixture super thick.


PRINT RECIPE


In Cocktails

SAND TARTS

December 9, 2019 Julie Sanchez
DSC05460.jpg

Sand Tarts…what can I say…they are my favorite cookie ever! I always bake them over the holidays, so they have become a tradition in our home. Back in the 80’s my co workers and I work often ate lunch at Frost Bros. (a department store that has since closed) on Shepherd Drive. They would serve little buttery biscuits to start and sand tarts to end your meal in this tea room. We finally asked for the recipe and the rest is history.


DSC05323.jpg

Easy list of ingredients. You need to soften your butter overnight. Even you can find chopped pecans, you will need to chop them finer.


DSC05331.jpg

I love my nut chopper… I bought it at Bering’s Hardware. (They also have them on Amazon.) My mother also had one, and once you make these cookies and get addicted, you will probably want one as well. The pecans must be chopped finely, since the cookies are really small you need small pieces of pecans. It important to measure the pecans once chopped, and not measure a cup of pecans and then chop them.


DSC05329.jpg

Sift the flour, salt and baking soda together.


DSC05326.jpg

Add 4 tablespoons powdered sugar to 1 cup ( 2 sticks) of softened butter. I let the butter sit overnight in a large bowl.


DSC05335.jpg

Once you have creamed the powdered sugar with the butter, slowly add the flour.


DSC05338.jpg

Once about half your flour has been mixed, in add your vanilla. Then incorporate the rest of the flour.


DSC05341.jpg

The mixture is so thick at this point you need to mix the pecans in by hand. The mixer can not handle this step.


DSC05346.jpg

The mixture is rather thick, but do not worry.


DSC05376.jpg

Roll dough into 1” balls. This is important, do not be tempted to make bigger balls. They need to be small and bite size. The cookies do not really spread while cooking, so you can place them about 2” apart. The recipe makes 5 dozen cookies, and my pan can hold 4 dozen. When I was working on my blog, I decided to add the remaining dough to make just 4 dozen so I could cook them all on one pan. They did not turn out as good. They need to be small and bite size and the larger ones did not have the right powdered sugar to cookie ratio.


DSC05379.jpg

Gently mash the cookies slightly flat with a gentle touch.


DSC05381.jpg

Cookies are ready to bake. Bake at 375 for 15-20 minutes till lightly browned. It takes my oven 18 minutes, but check on them in 15.


DSC05357.jpg

While cookies are baking, sift 2 cups of powdered sugar in medium bowl.


DSC05385.jpg

My beautiful powdered sugar mountain!


DSC05386 (1).jpg

As you can see, my cookies have a slight golden color. Set up a station with the baked cookies, the sugar and a plate to place them on.


DSC05390 (1).jpg

Once the cookies are removed from the oven, coat the cookies in powdered sugar. It is important to coat the cookies while they are still warm. Sometimes I sprinkle extra powdered sugar on the cookies once I have coated them all.


DSC05392.jpg

To transfer the cookies it is best to use a spatula. If you pick them up with your hands, your fingers will tend to remove the powdered sugar from the cookie.


IMG_4907.JPG

I dare you to eat just one!


SAND TART RECIPE


SERVES: Makes 4 dozen
Prep Time: 20 minutes
Cooking Time: 15-20 minutes

INGREDIENTS

  • 1 cup butter, softened

  • 4 tablespoons powdered sugar

  • 1 cup finely chopped pecans

  • 2 cups flour

  • 1/2 teaspoon salt

  • 1 1/2 teaspoons baking powder

  • 1 tablespoon vanilla

  • 2 cups powdered sugar, sifted

preparation

  1. Put 2 sticks of butter in large bowl, and let soften overnight.

  2. Heat oven to 375.

  3. Finely chop pecans to measure one cup.

  4. Sift together flour, salt and baking powder into small bowl.

  5. Add 4 tablespoons powdered sugar to butter and mix to combine.

  6. Slowly add in flour mixture. Add vanilla about half way through adding the flour mixture and mix till combined.

  7. Since the mixture is thick, add the chopped nuts by hand.

  8. Make 1” balls and place 2” apart on a cookie sheet.

  9. Gently mash the cookies slightly flat.

  10. Bake 15-20 minutes, till light golden brown.

  11. While the cookies are baking, sift 2 cups of powdered sugar in a medium bowl.

  12. Gently coat the cookies in the powdered sugar while the cookies are warm.

  13. Once all the cookies are coated you can sprinkle extra powdered sugar on all the cookies to make them even more beautiful.


PRINT RECIPE


In Dessert

BRIE, CRANBERRY & WALNUT TARTLETS

November 14, 2019 Julie Sanchez
DSC05165.jpg

This is one of my go to appetizers I serve over the holidays. I love these for so many reasons…they can be made in advance, they follow the theme of the holidays with the cranberries, and they have brie in them…need I say more.


DSC05120.jpg

I found these mini phyllo tart shells at Central Market; you can also order them online at Amazon. You need brie, walnuts, and cranberry sauce which I purchased from Trader Joes… it is a little chunky, not too smooth and it has the perfect amount of tart versus sweet taste.


DSC05319.jpg

You can substitute pecans for the walnuts. Just realized that Whole Foods has chopped pecans, which makes this recipe super easy.


DSC05124.jpg

I place the tart shells in a cake pan.


DSC05129.jpg

I do not like the texture nor the taste of the brie rind so I use a peeler to get most of it off.


DSC05142.jpg

Roll the brie into twelve 1” balls. It is easier to put them on a plate so you can see if they are all the same size.


DSC05146.jpg

Make an indention in the brie with your thumb. The indention is for the cranberry sauce; it will more contained this way and it keeps the cranberry sauce from trailing onto the tart shells making them soggy and unattractive.


DSC05148.jpg

The shells are ready for the cranberry sauce.


DSC05153.jpg

Spoon 1/4 teaspoon cranberry sauce into each cavity. Try not to get cranberry sauce on the shells, it will make them soggy if your preparing these in advance.


DSC05157.jpg

Finely chop 1/4 cup walnuts.


DSC05158.jpg

Its less messy to take each shell out and sprinkle the nuts over the existing nuts, than to try to sprinkle the nuts into the pan. Trust me on this. After sprinkling the nuts, place a small dot of cranberry sauce on each tart to finish them off. Bake at 350 for 7-9 minutes or until the brie has melted.


DSC05175.jpg

Warm Brie with a crunchy bite of walnut and a tart and sweet cranberry finish….perfection!


BRIE, CRANBERRY & WALNUT TARLETS RECIPE


Serves: 4-5 people
Prep Time: 15 minutes
Cooking Time: 7-9 minutes

ingredients

  • 1 Box, 12 phyllo pastry mini shells

  • 8 ounces brie

  • 6 teaspoons cranberry sauce

  • 1/4 cups walnuts, (or pecans) chopped finely

PREPARATION

  1. Preheat oven to 350

  2. Place tart shells in an oven proof cake pan or cookie sheet.

  3. Use a vegetable peeler or knife to scrap the rind off the brie.

  4. Roll the brie into twelve 1” balls and place on plate.

  5. Take a brie ball and make an indention with your thumb so the cranberry sauce will be contained and not run off the tarts.

  6. Place the indented brie into the tarts and spoon 1/4 teaspoon of cranberry sauce into each cavity trying not to get cranberry sauce on the shells.

  7. Chop your walnuts finely.

  8. Pick up each tartlet, hold it over the chopped nuts and sprinkle with the chopped walnuts.

  9. Add an additional small dot of cranberry sauce on each one to finish them off.

  10. Bake at 350 for 7-9 minutes till the brie has melted.

Note: They can really be heated at any temperature; Thanksgiving means your ovens are full, so heat them at whatever temperature works for you.


Note: If you are transporting these to a party, place a paper towel under them, so they do not slide everywhere, and remove towel before heating.


PRINT RECIPE


In Appetizer

CARROT CAKE WITH CREAM CHEESE FROSTING

October 21, 2019 Julie Sanchez
DSC05064.jpg

I have been making this deliciously moist carrot cake for over 30 years. Someone gave me the recipe back in the eighties. I actually altered the original frosting recipe a little bit. Carrot cake has been requested by my sons for most of their birthdays, and pretty much every Thanksgiving; it is a tradition in our home.


DSC05003.jpg

You will need 4-6 carrots, depending on how fat they are, and you need large eggs. Parchment paper just guarantees the cake to come out easily from the pan. Any vegetable oil can be used.


DSC05005.jpg

Parchment paper will help get your cake of the pan with ease. Make a template of the bottom of the pan with a pencil.


DSC05008.jpg

Fold the paper into four lining up the lines you drew. Cut out your template.


DSC05011.jpg

Place the first folded template on top of your second folded parchment and cut out your second circle.


DSC05012.jpg

You need to butter the sides of the pan. If you use a baggie, your fingers will stay clean.


DSC05013.jpg

Pans are now ready.


DSC05019.jpg

After you peel the carrots, you need to grate them on a large bowl, since the carrots tend to fly as they get grated. Grate the skinny end of the carrot first so you have something to hold onto as you grate. You will need two slightly packed cups.


DSC05022.jpg

Chop the pecans finely, you need 1 cup.


DSC04997.jpg

When you are measuring flour spoon the flour into the measuring cup and scrape off the top with the flat side of a knife.


DSC05027.jpg

Sift together 2 cups of flour and 2 cups of sugar with 1 tablespoon cinnamon and 2 teaspoons baking soda. Stir in 1 1/3 cups vegetable oil. The mixture will be thick and look weird but its normal.


DSC05028.jpg

Now add 1 egg at time, stirring after each egg till you have reached 4 eggs. This mixture is weird, as you can see it gets thicker with the first egg, which is opposite of what you think should happen. This mixture is really too thick to try to use a electric mixer, its best to beat it by hand.


DSC05030.jpg

This is how the mixture looks after 2 eggs, still thick.


DSC05032.jpg

After adding the 4th egg and stirring till combined, the mixture becomes smooth.


DSC05034.jpg

Add the carrots and stir till combined.


DSC05037.jpg

Add the pecans and stir till combined.


DSC05038.jpg

Cakes need to bake 35-40 minutes or until a toothpick inserted in the middle comes out clean.


DSC05046.jpg

Let the cakes cool 20 minutes, then run a knife around the edges, flip the pans over onto your hand and gently peel off the parchment paper, and cool on a rack. If you do not have a rack just place them on a piece of foil on the counter.


DSC04990.jpg

The ingredients needed for your icing. The butter and cream cheese need to be softened at room temperature. It usually takes 1-2 hours to soften depending on your climate. You also need whole pecans to decorate the top.


DSC04992.jpg

In a large mixing bowl add 1 stick of butter and 8 ounces of cream cheese, and 1 teaspoon of vanilla. Let soften at room temperature for a few hours.


DSC05051.jpg

You will need an electric mixer for this stage. Once your butter/cream cheese mixture has softened whip on high speed ‘til the mixture is creamy and fluffy…a couple of minutes. Add in 1 cup of powdered sugar at a time (for a total of 3 cups) to prevent a powdered sugar dust explosion in your house. Start the mixer on low each time you add another cup of sugar till combined, then increase speed to make smooth and creamy.


DSC05058.jpg

I like to place foil strips around the bottom edge of the cake. Once iced you can remove the foil pieces so your cake plate stays clean on the cake edges. Place one cake on a flat surface, place a blob of icing and spread on the top, the add the second cake layer. Then coat the sides with a thin coat, often called a crumb coat. As you can see I am only applying the crumb coat in this pic. Once the sides have the crumb coat, place a blob of icing on the top, and use the remaining icing to cover the sides. Place whole pecans around the top of the cake.


DSC05078.jpg

My favorite time of day to eat carrot cake is in the morning with a cup of coffee…that way the calories do not really count.


cARROT CAKE RECIPE


Serves: roughly 15 people
Prep Time: 20 minutes
Cooking Time: 35-40 minutes

INGREDIENTS

  • 2 sheets parchment paper

  • 1 tablespoon butter

  • 2 cups grated carrots, 4-6 medium carrots

  • 1 cup pecans, chopped finely

  • 2 cups all purpose flour

  • 2 cups white sugar

  • 1 tablespoon ground cinnamon

  • 2 teaspoons baking soda

  • 1 1/3 cups vegetable oil

  • 4 large eggs

preparation

  1. Cut up templates of parchment to line the bottom of your cake pans, instructions above.

  2. Butter the sides only of your pans.

  3. Preheat your oven to 350 degrees.

  4. Peel the carrots, and grate 2 cups.

  5. Finely chop 1 cup of pecans.

  6. In large bowl sift together flour, sugar, cinnamon, and baking soda.

  7. Add the oil to the flour mixture and stir to combine.

  8. Add 1 egg at a time to the flour mixture, beating mixture after every egg. The mixture will seem thick till the 4 egg is added.

  9. Add the carrots, and mix till combined.

  10. Add the pecans and mix till combined and smooth.

  11. Pour into the 2 cake pans.

  12. Bake for 35-40 minutes or until toothpick inserted in center is clean.

  13. Let cakes cool for 20 minutes, run knife around edges, flip pans upside down onto your hands to remove parchment and let cool before applying frosting.

  14. Frosting Instructions are detailed above. Once frosted, line the edge of the top of the cake with whole pecans.


CREAM CHEESE FROSTING RECIPE


Prep Time: 2 hours to soften butter, 20 minutes to prepare and ice cake

INGREDIENTS

  • 1 stick (1/2 cup) unsalted butter, softened to room temperature

  • 8 ounces cream cheese, softened to room temperature

  • 1 teaspoon vanilla extract

  • 3 cups powdered sugar

  • roughly 30 whole pecans

preparation

  1. Combine butter, cream cheese, a vanilla in large bowl.

  2. Let butter and cream cheese soften and come to room temperature, about 2 hours.

  3. Mix a hand mixer beat the butter mixture on high till fluffy and creamy.

  4. Add 1 cup at a time of powdered sugar, and start the mixer on low and increase speed to high, so powdered sugar will not fly everywhere. Beat mixture till smooth and creamy.


PRINT RECIPE


In Dessert

BLUEBERRY GIN & TONIC

July 13, 2019 Julie Sanchez
DSC04926.jpg

It is really hot here in Houston in July, so we need drinks that are super refreshing. So far this summer this Blueberry Gin & Tonic is my new “go to” drink. I tried this recipe with blackberries as well, but blackberries are more difficult to crush, and I do not always have them around. Since I eat blueberries every morning, they are always in my fridge. Most recipes call for boiling the blueberries with sugar. I do not need any extra sugar in my life. Muddling the blueberries, instead of boiling them, is a fresher and healthier approach in my opinion.


DSC04788.jpg

My favorite tonic is Fever Tree… I buy it at Whole Foods. You need fresh organic blueberries, gin and a fresh lime.


DSC04823.jpg

You can also add mint leaves to this recipe, along with the blueberries.


DSC04795.jpg

In a glass, add a small handful of blueberries (roughly 12-15). But actually there is no need to count the blueberries, there is no way to mess this recipe up. Squeeze 1/2 of a lime into the cup with the blueberries.


DSC04798.jpg

Now muddle your blueberries. I just bought my muddler at Williams Sonoma, it is made by OXO. If you do not have one than simply use a fork.


DSC04803 (1).jpg

My muddled mixture.


DSC04805.jpg

Measure 3 ounces of gin into your glass.


DSC04812 (1).jpg

Add the tonic to the mixture and stir.


DSC04814.jpg

Strain the mixture into a pourable measuring cup. Do not press the mixture in the strainer (simply let it drip), otherwise it will cloud your drink.


DSC04822.jpg

If you are a perfectionist you may strain the mixture once more, since little particles can slip through. I usually am too impatient for this second finer strainer step.


BLUEBERRY GIN & TONIC RECIPE


Serves: 1 person
Prep Time: 5 minutes

INGREDIENTS

  • small handful of blueberries

  • juice of 1/2 lime

  • 3 ounces gin

  • 6-7 ounces tonic

OPTIONAL INGREDIENT

  • Mint leaves

PREPARATION

  1. Place a small handful of blueberries into a glass.

  2. Squeeze the juice of 1/2 lime into the glass as well.

  3. Muddle the blueberries till they are broken up and mushy.

  4. Add 3 ounces of gin to the glass.

  5. Add the bottle of tonic.

  6. Stir to combine and strain into a pourable glass. Do not push the blueberry mixture through the strainer, let it drip by itself, so your liquid does not become cloudy.

  7. Strain again for a finer filter.

  8. Pour into a wine glass filled with ice.

  9. Good luck having just one.


PRINT RECIPE


In Cocktails
← Newer Posts Older Posts →