• Home
  • Categories
  • Contact
  • Subscribe
  • About
Menu

Julie's Taste

Street Address
City, State, Zip
Phone Number

Your Custom Text Here

Julie's Taste

  • Home
  • Categories
  • Contact
  • Subscribe
  • About

BRANDY FREEZE

December 21, 2023 Julie Sanchez

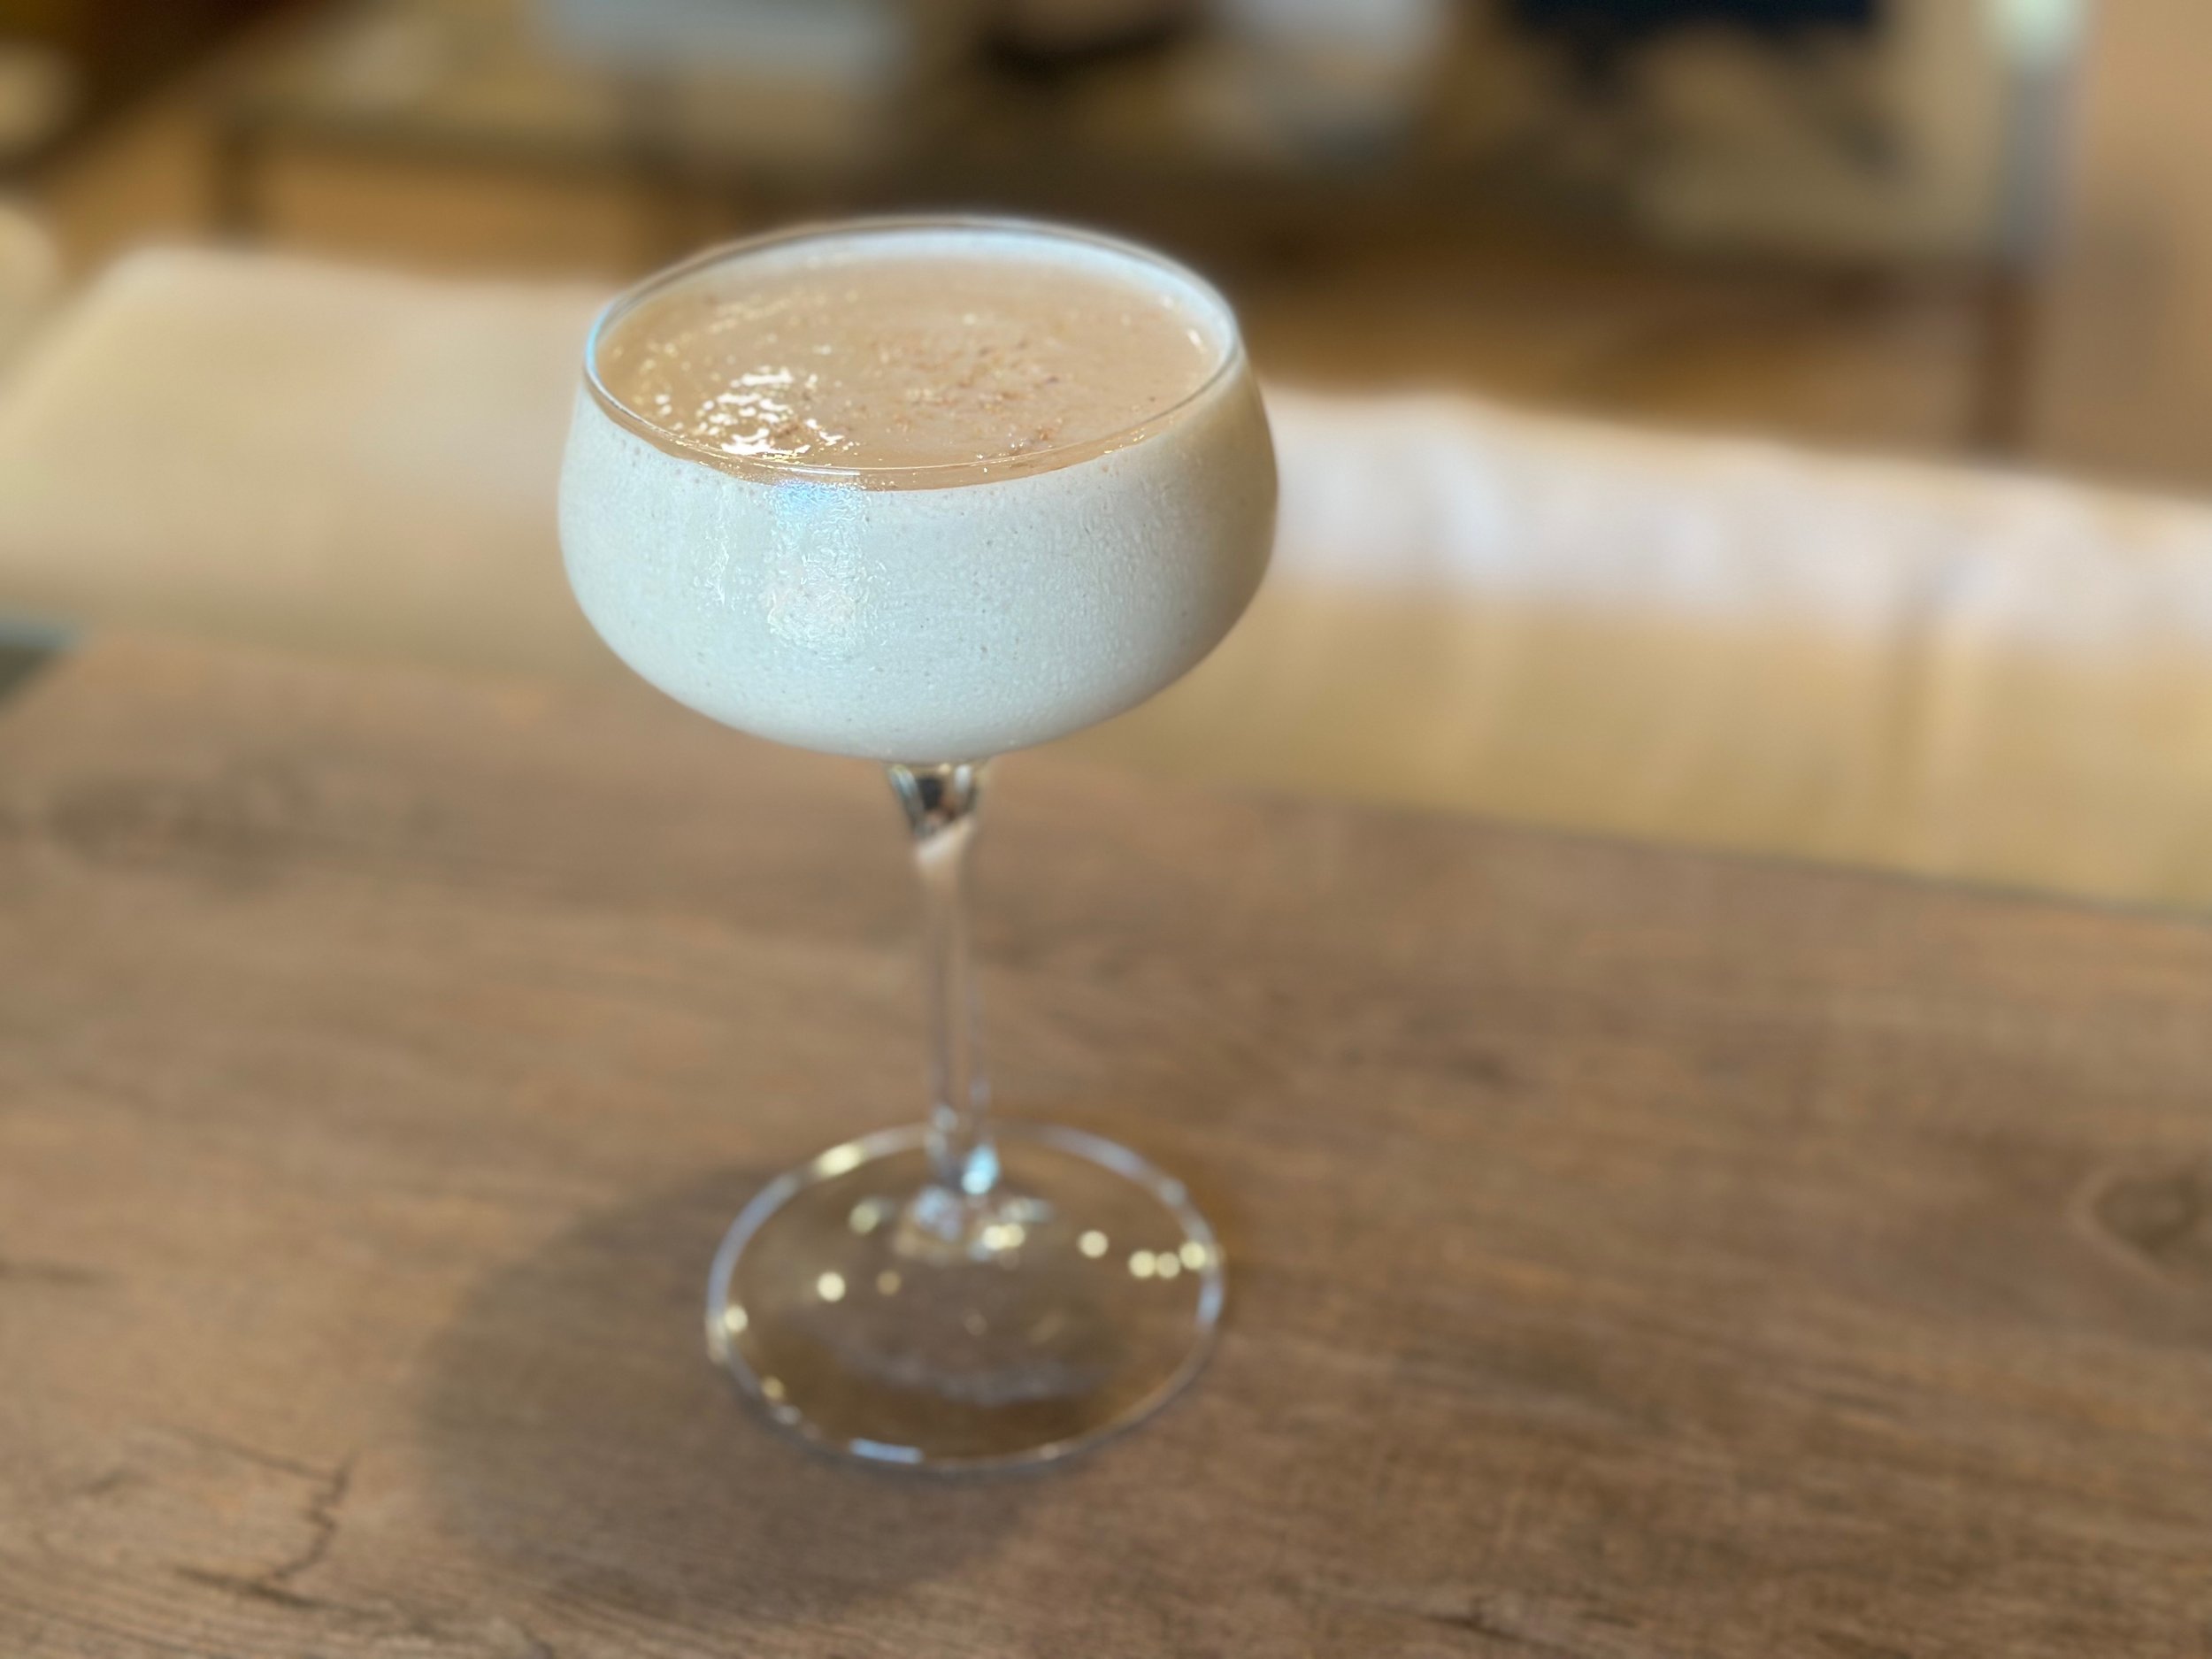
I had never heard of or tasted a Brandy Freeze till a couple of weeks ago. We were at dinner with friends…my hubby and I split a Brandy Freeze for dessert. We sucked it down in record time. This recipe is my delicious and decadent take on a cocktail which I consider dessert!


You only need ice cream, Creme de Cacao, Brandy/Cognac, and nutmeg to grate on top. (Cognac is simply Brandy made in the region of Cognac, France.)


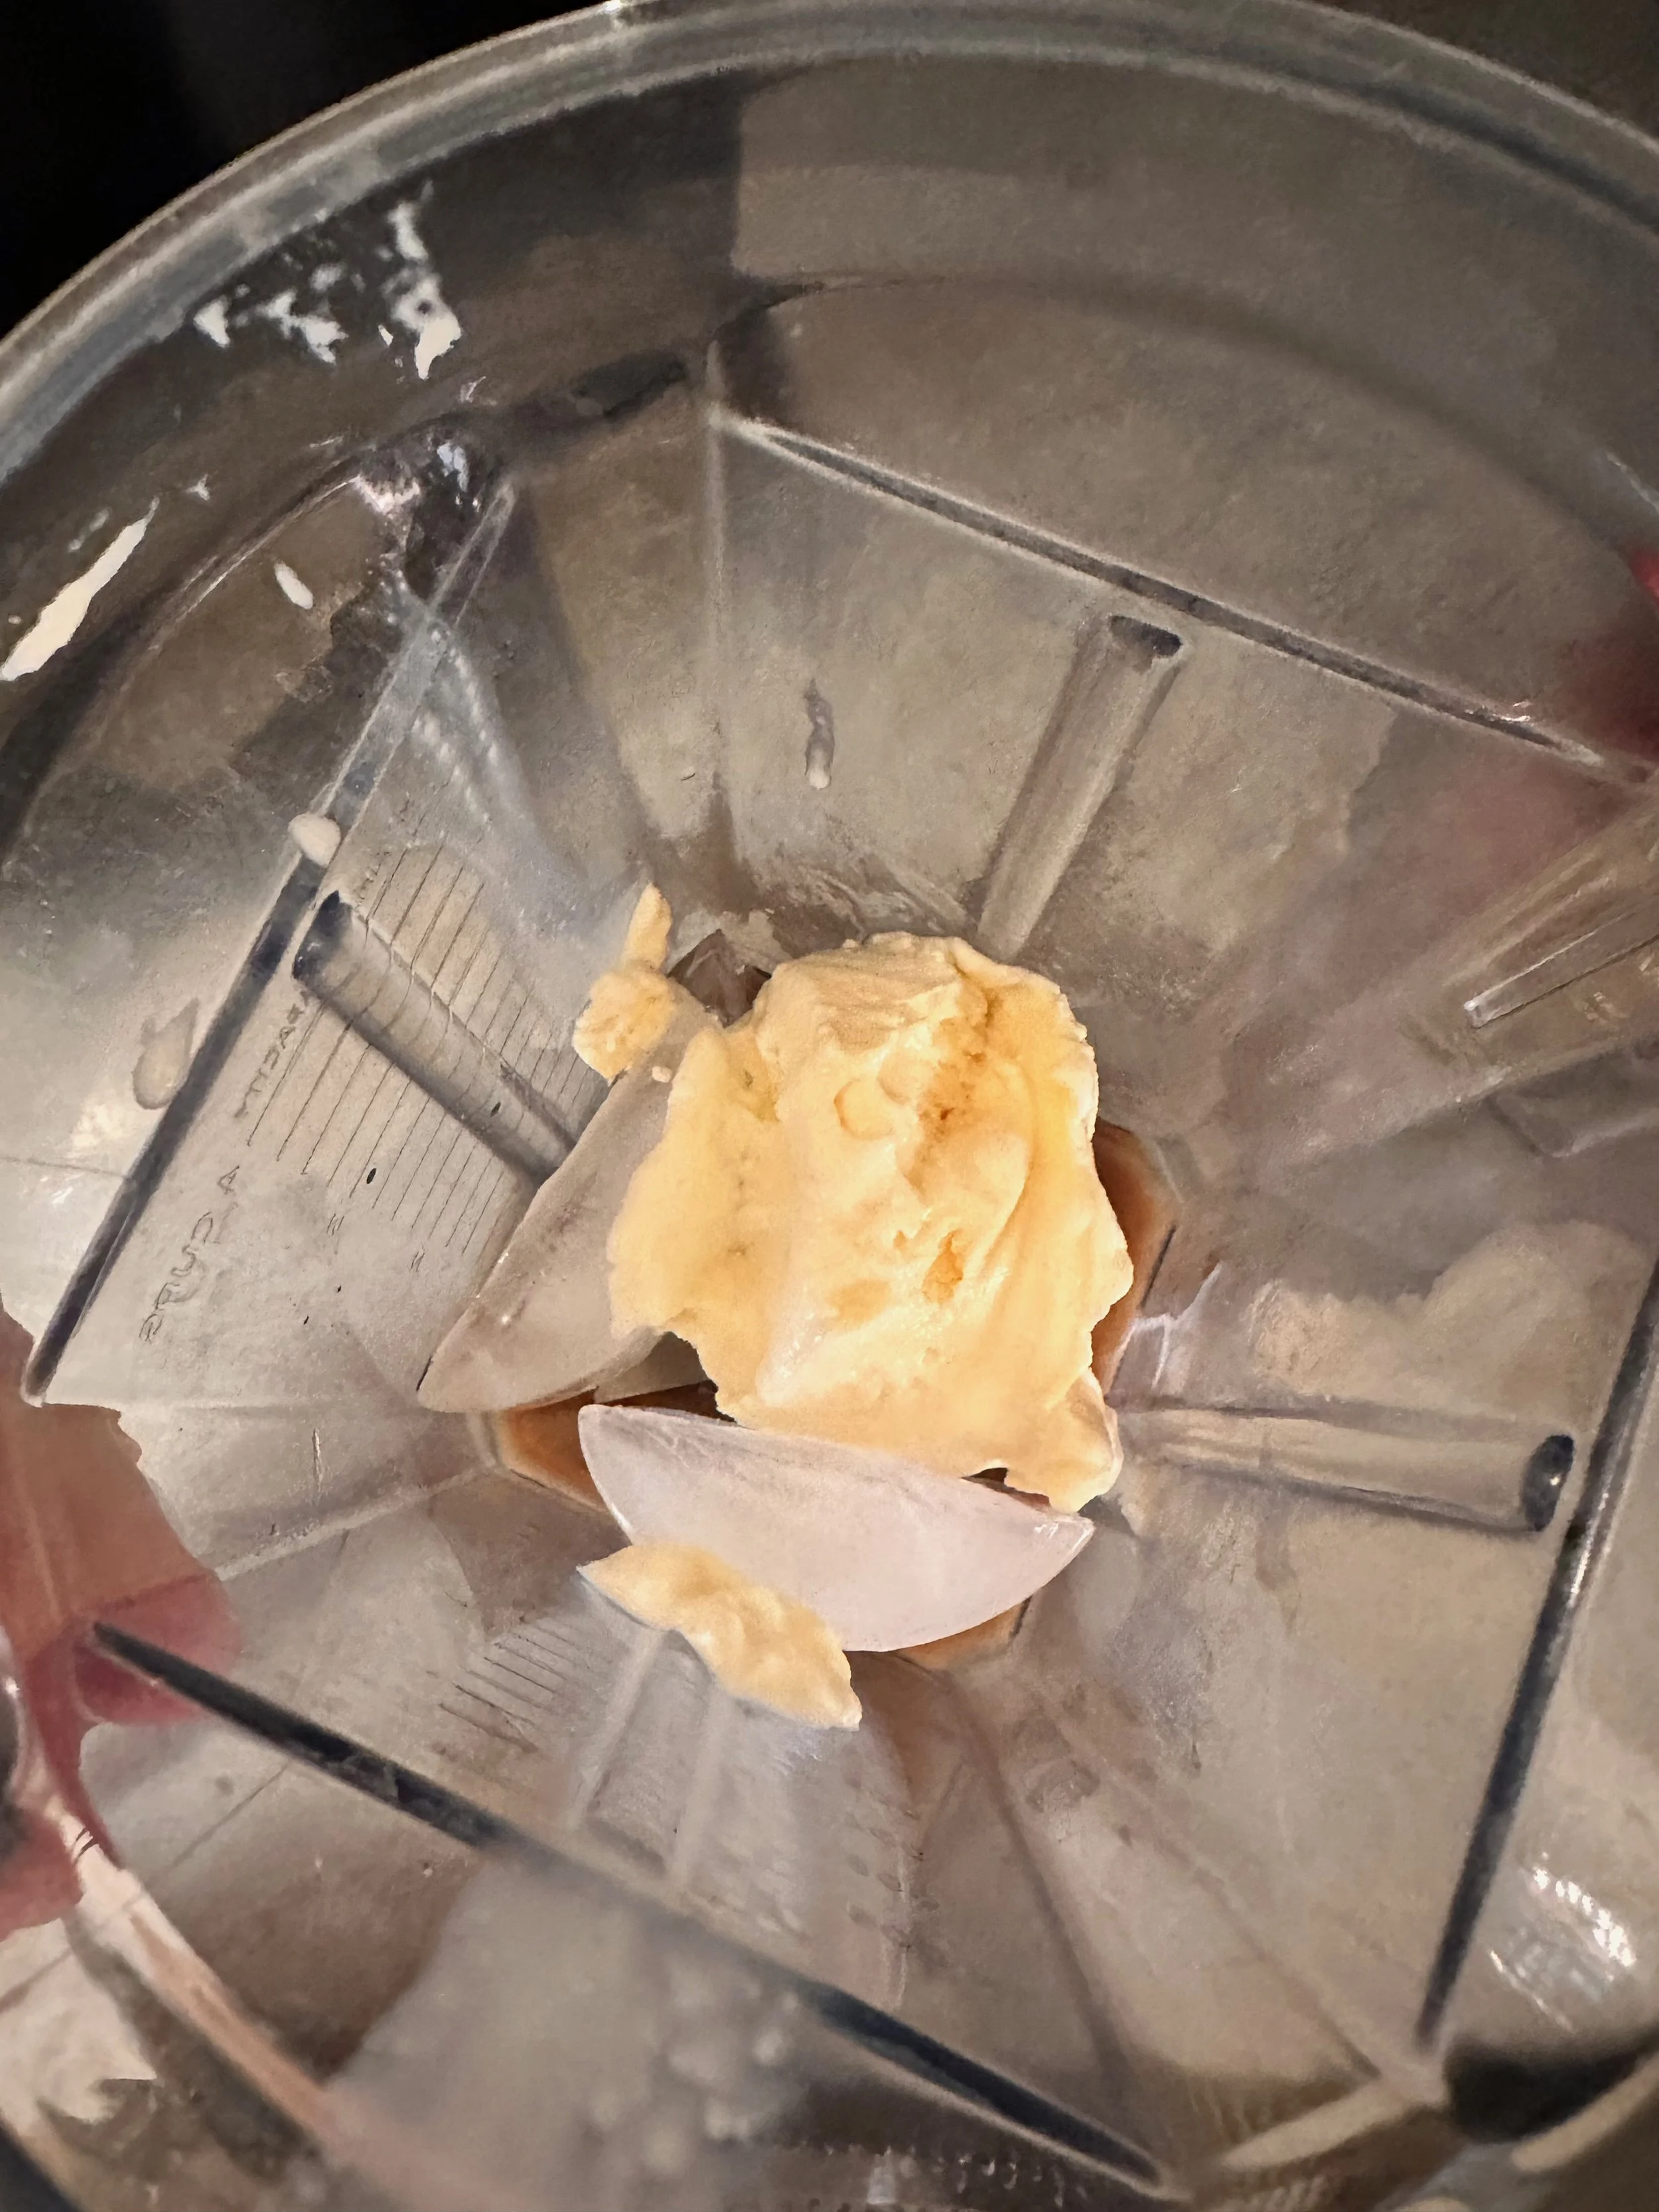
Scoop the ice cream into a blender with the liquor and add 3 ice cubes.


Ready to blend till creamy.


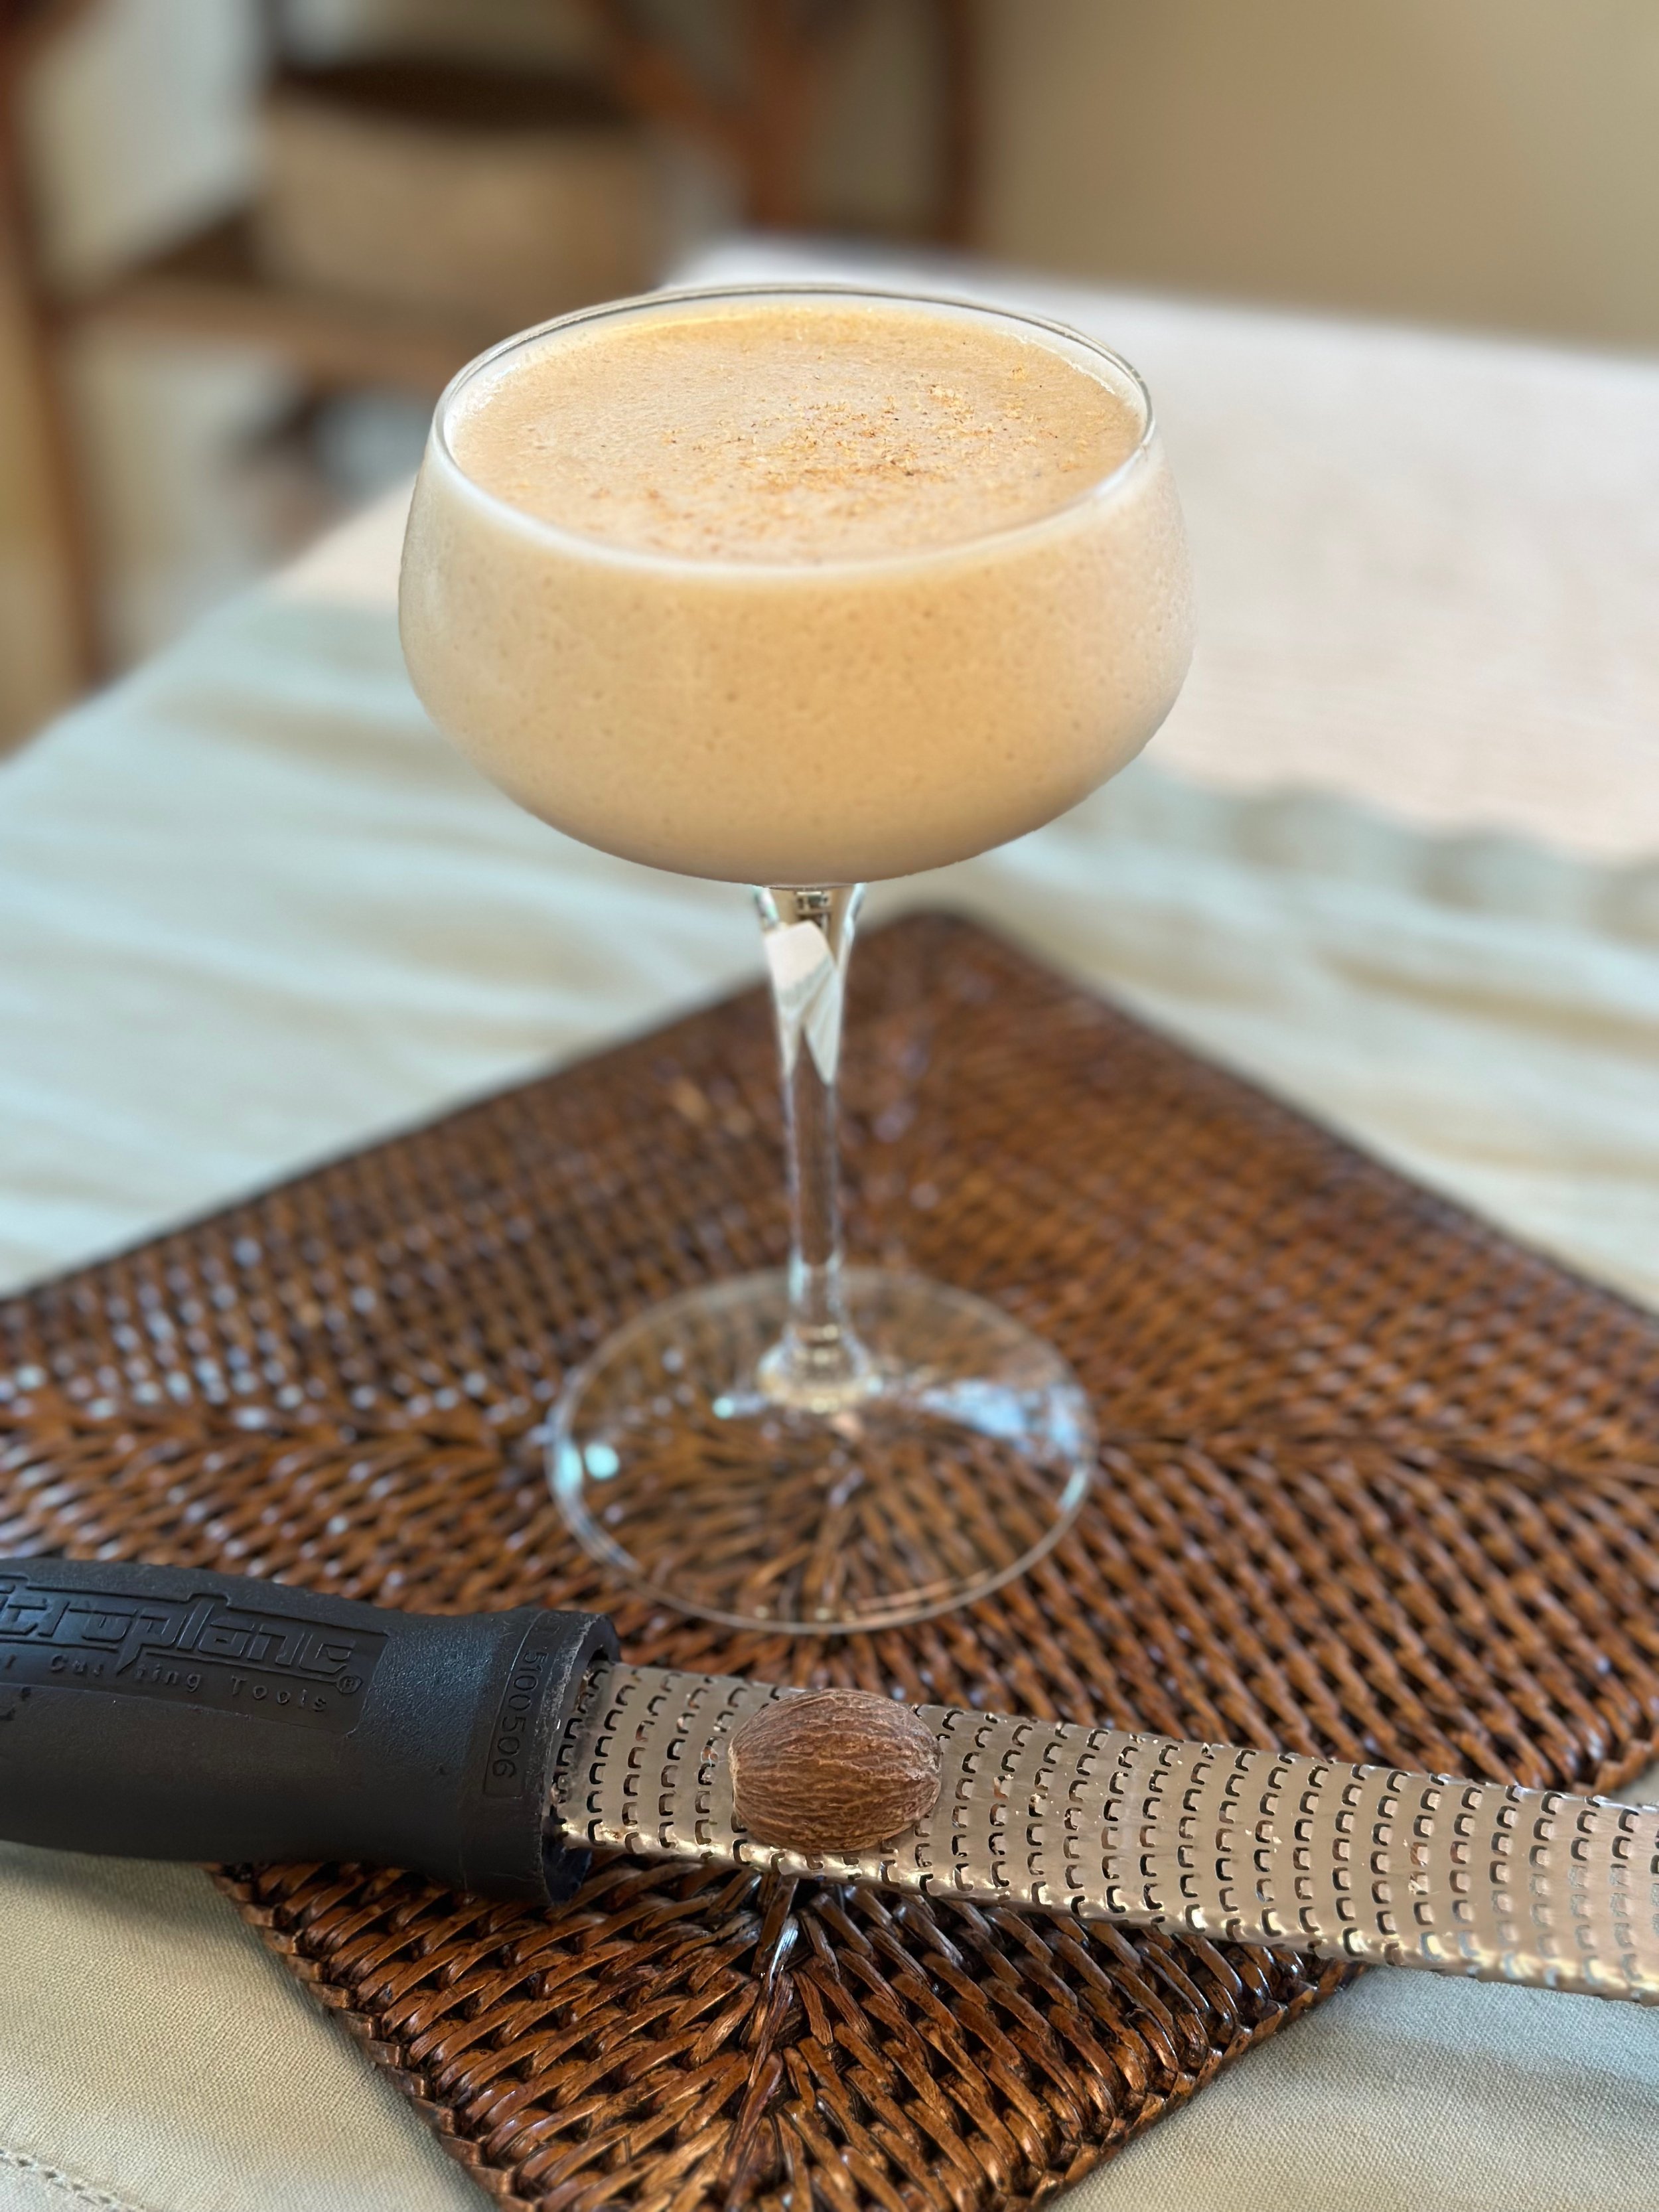
Grate fresh nutmeg on top with a microplane.


BRANDY FREEZE RECIPE


Serves: 1 person
Prep Time: 5 minutes

INGREDIENTS

  • 1/2 cup vanilla ice cream

  • 3/4 ounce Creme de Cacao

  • 1 1/2 ounces Brandy or Cognac

  • 3 ice cubes

  • nutmeg, grated

PREPARATION

  1. In a blender add the 2 liquors, the ice cream, and ice.

  2. Blend till smooth and creamy.

  3. Use a microplane to grate nutmeg on top.


PRINT RECIPE


In Cocktails, Dessert

SAND TARTS

December 9, 2019 Julie Sanchez
DSC05460.jpg

Sand Tarts…what can I say…they are my favorite cookie ever! I always bake them over the holidays, so they have become a tradition in our home. Back in the 80’s my co workers and I work often ate lunch at Frost Bros. (a department store that has since closed) on Shepherd Drive. They would serve little buttery biscuits to start and sand tarts to end your meal in this tea room. We finally asked for the recipe and the rest is history.


DSC05323.jpg

Easy list of ingredients. You need to soften your butter overnight. Even you can find chopped pecans, you will need to chop them finer.


DSC05331.jpg

I love my nut chopper… I bought it at Bering’s Hardware. (They also have them on Amazon.) My mother also had one, and once you make these cookies and get addicted, you will probably want one as well. The pecans must be chopped finely, since the cookies are really small you need small pieces of pecans. It important to measure the pecans once chopped, and not measure a cup of pecans and then chop them.


DSC05329.jpg

Sift the flour, salt and baking soda together.


DSC05326.jpg

Add 4 tablespoons powdered sugar to 1 cup ( 2 sticks) of softened butter. I let the butter sit overnight in a large bowl.


DSC05335.jpg

Once you have creamed the powdered sugar with the butter, slowly add the flour.


DSC05338.jpg

Once about half your flour has been mixed, in add your vanilla. Then incorporate the rest of the flour.


DSC05341.jpg

The mixture is so thick at this point you need to mix the pecans in by hand. The mixer can not handle this step.


DSC05346.jpg

The mixture is rather thick, but do not worry.


DSC05376.jpg

Roll dough into 1” balls. This is important, do not be tempted to make bigger balls. They need to be small and bite size. The cookies do not really spread while cooking, so you can place them about 2” apart. The recipe makes 5 dozen cookies, and my pan can hold 4 dozen. When I was working on my blog, I decided to add the remaining dough to make just 4 dozen so I could cook them all on one pan. They did not turn out as good. They need to be small and bite size and the larger ones did not have the right powdered sugar to cookie ratio.


DSC05379.jpg

Gently mash the cookies slightly flat with a gentle touch.


DSC05381.jpg

Cookies are ready to bake. Bake at 375 for 15-20 minutes till lightly browned. It takes my oven 18 minutes, but check on them in 15.


DSC05357.jpg

While cookies are baking, sift 2 cups of powdered sugar in medium bowl.


DSC05385.jpg

My beautiful powdered sugar mountain!


DSC05386 (1).jpg

As you can see, my cookies have a slight golden color. Set up a station with the baked cookies, the sugar and a plate to place them on.


DSC05390 (1).jpg

Once the cookies are removed from the oven, coat the cookies in powdered sugar. It is important to coat the cookies while they are still warm. Sometimes I sprinkle extra powdered sugar on the cookies once I have coated them all.


DSC05392.jpg

To transfer the cookies it is best to use a spatula. If you pick them up with your hands, your fingers will tend to remove the powdered sugar from the cookie.


IMG_4907.JPG

I dare you to eat just one!


SAND TART RECIPE


SERVES: Makes 4 dozen
Prep Time: 20 minutes
Cooking Time: 15-20 minutes

INGREDIENTS

  • 1 cup butter, softened

  • 4 tablespoons powdered sugar

  • 1 cup finely chopped pecans

  • 2 cups flour

  • 1/2 teaspoon salt

  • 1 1/2 teaspoons baking powder

  • 1 tablespoon vanilla

  • 2 cups powdered sugar, sifted

preparation

  1. Put 2 sticks of butter in large bowl, and let soften overnight.

  2. Heat oven to 375.

  3. Finely chop pecans to measure one cup.

  4. Sift together flour, salt and baking powder into small bowl.

  5. Add 4 tablespoons powdered sugar to butter and mix to combine.

  6. Slowly add in flour mixture. Add vanilla about half way through adding the flour mixture and mix till combined.

  7. Since the mixture is thick, add the chopped nuts by hand.

  8. Make 1” balls and place 2” apart on a cookie sheet.

  9. Gently mash the cookies slightly flat.

  10. Bake 15-20 minutes, till light golden brown.

  11. While the cookies are baking, sift 2 cups of powdered sugar in a medium bowl.

  12. Gently coat the cookies in the powdered sugar while the cookies are warm.

  13. Once all the cookies are coated you can sprinkle extra powdered sugar on all the cookies to make them even more beautiful.


PRINT RECIPE


In Dessert

CARROT CAKE WITH CREAM CHEESE FROSTING

October 21, 2019 Julie Sanchez
DSC05064.jpg

I have been making this deliciously moist carrot cake for over 30 years. Someone gave me the recipe back in the eighties. I actually altered the original frosting recipe a little bit. Carrot cake has been requested by my sons for most of their birthdays, and pretty much every Thanksgiving; it is a tradition in our home.


DSC05003.jpg

You will need 4-6 carrots, depending on how fat they are, and you need large eggs. Parchment paper just guarantees the cake to come out easily from the pan. Any vegetable oil can be used.


DSC05005.jpg

Parchment paper will help get your cake of the pan with ease. Make a template of the bottom of the pan with a pencil.


DSC05008.jpg

Fold the paper into four lining up the lines you drew. Cut out your template.


DSC05011.jpg

Place the first folded template on top of your second folded parchment and cut out your second circle.


DSC05012.jpg

You need to butter the sides of the pan. If you use a baggie, your fingers will stay clean.


DSC05013.jpg

Pans are now ready.


DSC05019.jpg

After you peel the carrots, you need to grate them on a large bowl, since the carrots tend to fly as they get grated. Grate the skinny end of the carrot first so you have something to hold onto as you grate. You will need two slightly packed cups.


DSC05022.jpg

Chop the pecans finely, you need 1 cup.


DSC04997.jpg

When you are measuring flour spoon the flour into the measuring cup and scrape off the top with the flat side of a knife.


DSC05027.jpg

Sift together 2 cups of flour and 2 cups of sugar with 1 tablespoon cinnamon and 2 teaspoons baking soda. Stir in 1 1/3 cups vegetable oil. The mixture will be thick and look weird but its normal.


DSC05028.jpg

Now add 1 egg at time, stirring after each egg till you have reached 4 eggs. This mixture is weird, as you can see it gets thicker with the first egg, which is opposite of what you think should happen. This mixture is really too thick to try to use a electric mixer, its best to beat it by hand.


DSC05030.jpg

This is how the mixture looks after 2 eggs, still thick.


DSC05032.jpg

After adding the 4th egg and stirring till combined, the mixture becomes smooth.


DSC05034.jpg

Add the carrots and stir till combined.


DSC05037.jpg

Add the pecans and stir till combined.


DSC05038.jpg

Cakes need to bake 35-40 minutes or until a toothpick inserted in the middle comes out clean.


DSC05046.jpg

Let the cakes cool 20 minutes, then run a knife around the edges, flip the pans over onto your hand and gently peel off the parchment paper, and cool on a rack. If you do not have a rack just place them on a piece of foil on the counter.


DSC04990.jpg

The ingredients needed for your icing. The butter and cream cheese need to be softened at room temperature. It usually takes 1-2 hours to soften depending on your climate. You also need whole pecans to decorate the top.


DSC04992.jpg

In a large mixing bowl add 1 stick of butter and 8 ounces of cream cheese, and 1 teaspoon of vanilla. Let soften at room temperature for a few hours.


DSC05051.jpg

You will need an electric mixer for this stage. Once your butter/cream cheese mixture has softened whip on high speed ‘til the mixture is creamy and fluffy…a couple of minutes. Add in 1 cup of powdered sugar at a time (for a total of 3 cups) to prevent a powdered sugar dust explosion in your house. Start the mixer on low each time you add another cup of sugar till combined, then increase speed to make smooth and creamy.


DSC05058.jpg

I like to place foil strips around the bottom edge of the cake. Once iced you can remove the foil pieces so your cake plate stays clean on the cake edges. Place one cake on a flat surface, place a blob of icing and spread on the top, the add the second cake layer. Then coat the sides with a thin coat, often called a crumb coat. As you can see I am only applying the crumb coat in this pic. Once the sides have the crumb coat, place a blob of icing on the top, and use the remaining icing to cover the sides. Place whole pecans around the top of the cake.


DSC05078.jpg

My favorite time of day to eat carrot cake is in the morning with a cup of coffee…that way the calories do not really count.


cARROT CAKE RECIPE


Serves: roughly 15 people
Prep Time: 20 minutes
Cooking Time: 35-40 minutes

INGREDIENTS

  • 2 sheets parchment paper

  • 1 tablespoon butter

  • 2 cups grated carrots, 4-6 medium carrots

  • 1 cup pecans, chopped finely

  • 2 cups all purpose flour

  • 2 cups white sugar

  • 1 tablespoon ground cinnamon

  • 2 teaspoons baking soda

  • 1 1/3 cups vegetable oil

  • 4 large eggs

preparation

  1. Cut up templates of parchment to line the bottom of your cake pans, instructions above.

  2. Butter the sides only of your pans.

  3. Preheat your oven to 350 degrees.

  4. Peel the carrots, and grate 2 cups.

  5. Finely chop 1 cup of pecans.

  6. In large bowl sift together flour, sugar, cinnamon, and baking soda.

  7. Add the oil to the flour mixture and stir to combine.

  8. Add 1 egg at a time to the flour mixture, beating mixture after every egg. The mixture will seem thick till the 4 egg is added.

  9. Add the carrots, and mix till combined.

  10. Add the pecans and mix till combined and smooth.

  11. Pour into the 2 cake pans.

  12. Bake for 35-40 minutes or until toothpick inserted in center is clean.

  13. Let cakes cool for 20 minutes, run knife around edges, flip pans upside down onto your hands to remove parchment and let cool before applying frosting.

  14. Frosting Instructions are detailed above. Once frosted, line the edge of the top of the cake with whole pecans.


CREAM CHEESE FROSTING RECIPE


Prep Time: 2 hours to soften butter, 20 minutes to prepare and ice cake

INGREDIENTS

  • 1 stick (1/2 cup) unsalted butter, softened to room temperature

  • 8 ounces cream cheese, softened to room temperature

  • 1 teaspoon vanilla extract

  • 3 cups powdered sugar

  • roughly 30 whole pecans

preparation

  1. Combine butter, cream cheese, a vanilla in large bowl.

  2. Let butter and cream cheese soften and come to room temperature, about 2 hours.

  3. Mix a hand mixer beat the butter mixture on high till fluffy and creamy.

  4. Add 1 cup at a time of powdered sugar, and start the mixer on low and increase speed to high, so powdered sugar will not fly everywhere. Beat mixture till smooth and creamy.


PRINT RECIPE


In Dessert

CHOCOLATE BARK

April 30, 2016 Julie Sanchez

 I have been making dark chocolate bark for years since my husband and I both love a little piece of dark chocolate after dinner. This is one of the easiest and yet elegant desserts. We have a lot of visitors from Mexico, and we entertain a lot, so I always keep this bark in my fridge for a simple, homemade, and delicious way to end a meal. 


Dark chocolate has become a superfood. One to two ounces a day of dark chocolate, that has a 70% or higher cocoa content, has many health benefits.  Dark Chocolate is loaded with antioxidants, helps lower blood pressure, raises HDL and lowers LDL cholesterol. Something that is delicious and good for you...I'm so in!!!

I like to buy the pecan pieces instead of whole pecans because they are less expensive than buying the whole pecans and the they are easier to measure. You can sprinkle fleur de sel or any special salt you may have to finish the bark. I always cook with fine sea salt so that it what I use. A coarser salt would also work as well. You need either parchment paper or foil. Parchment paper is so nice for so many baking needs. It makes for a very easy cleanup.


I like to chop up the pecans a little more for 2 reasons. First when you chop them finer they create this nut sawdust that looks cool on the bark. Secondly, the finer nuts adhere to the chocolate better.


Break up the chocolate bars into little pieces and place in a microwaveable bowl.


Microwave the chocolate for 1 minute. It will look like the photo above and you will think it is not melted enough, but once you begin to slowly stir the chocolate it will finish melting.


Stir your chocolate till all the pieces have melted and it is smooth. A rubber spatula is perfect for scraping all the chocolate out of the bowl onto your flat pan. 


Pour the chocolate onto your pan and smooth out to about a 7" x 11" rectangle. A offset spatula is helpful but a knife or spoon would work as well.


Use a wet paper towel to clean your bowl and spoon that touched the melted chocolate, otherwise your sponge or dishrag will become permanently brown and nasty looking. Trust me...I learned the hard way. 


Sprinkle your nuts evenly over the chocolate. Do not forget about the nut sawdust from the cutting board, spread that as well. With your fingertips carefully smoosh the pecans down into the chocolate. If your fingertips get chocolaty, wipe them off and continue pressing. You do not want your nuts to be covered in chocolate from your fingertips.  Sprinkle salt over the bark, then place in the fridge to get hard.


Once the chocolate is hard, carefully break up your bark with your hands. Some nuts will fall off...that is OK. Life is not perfect. Store your bark in a airtight container in your fridge. It will stay good for weeks.


It so much more satisfying to have a piece of salty pecan bark than a one ounce square of dark chocolate broken off from a bar...just sayin!


cHOCOLATE BARK RECIPE


Serves 10 people (or a 2 week supply for 2 chocoholics)

Prep Time: 7 minutes

Cook Time: 1 minute

INGREDIENTS

  • Two 3.2 - 3.5 ounce dark chocolates bars (70% or higher cocoa content) 
  • 1/2 cup chopped pecans
  • sea salt
  • parchment paper or foil

PREPARATION

  1. Place the pecans on a cutting board and chop a little finer. You are trying to create a little nut dust which looks cool on the bark.
  2. Pull out a flat cake pan or small cookie sheet that can fit in your fridge. If a cookie sheet does not fit in your fridge, you can use any flat pan or pans that will fit. Line the pan with either parchment paper or foil.
  3. Unwrap your chocolate and break into pieces in a small microwaveable bowl. (Taste your chocolate. If it is too bitter for you, then you can add a tablespoon of sugar into the chocolate at this point.)
  4. Microwave chocolate for one minute.
  5. Remove the bowl from the microwave, it will look like the chocolate is not melted, but it will slowly melt as you begin to stir the chocolate. Stir until completely melted and smooth.
  6. Use a rubber spatula to scrape the melted chocolate on your flat pan.
  7. Spread the chocolate with an inverted spreader or knife on your pan. You will want to spread it to about a 11" long by 7" shape. You do not want to go much bigger than this since the bark will become too thin.
  8. Sprinkle your nuts evenly over the top. Make sure to collect the nut dust from your cutting board and sprinkle that on as well.
  9. Sprinkle sea salt over the chocolate.
  10. Gently press the large pieces of nuts with a few fingers into the chocolate to make sure they are in the chocolate and not just sitting on the chocolate.
  11. Place sheet in fridge for at least 2 hours to set.
  12. Break up into pieces and store in the fridge in an airtight container. The bark will last for weeks this way. The bark will become too limp and not crisp if not kept in the fridge.

Note: Use wet paper towels, not your dishcloth or sponge to clean the items needed to melt the chocolate, otherwise your sponge will turn brown and there is no turning back.

Note: For a little extra kick you can add a pinch of cayenne pepper to your melted chocolate. The spicy and salty combo is addictive!


PRINT RECIPE


In Snack, Dessert